部署openstack-train版+ceph-Nautilus版
| 主机名 | 用途 | 磁盘 | 系统 | 公共网络 | 租户网络(VXLAN使用)/集群网络 |
| yum01 | 本地仓库源 | sda/300G | CentOS7.9 | ens33:192.168.59.250/24 | |
| controller | 控制节点 | sda/300G | CentOS7.9 | ens33:192.168.59.40/24 | ens34:10.168.59.40(没用到) |
| compute01 | 计算节点/cinder存储 | sda/300G,sdb/100G | CentOS7.9 | ens33:192.168.59.41/24 | ens34:10.168.59.41 |
| compute02 | 计算节点/cinder存储 | sda/300G,sdb/100G | CentOS7.9 | ens33:192.168.59.42/24 | ens34:10.168.59.42 |
| ceph01 | ceph存储节点/mon01/mgr01 | sda/300G,sdb/100G,sdc/100G/sdd/100G | CentOS7.9 | ens33:192.168.59.11/24 | ens34:10.168.59.11 |
| ceph02 | ceph存储节点/mon02/mgr02 | sda/300G,sdb/100G,sdc/100G/sdd/100G | CentOS7.9 | ens33:192.168.59.12/24 | ens34:10.168.59.12 |
| ceph03 | ceph存储节点/mon03/mgr03 | sda/300G,sdb/100G,sdc/100G/sdd/100G | CentOS7.9 | ens33:192.168.59.413/24 | ens34:10.168.59.13 |
参考学习网站:OpenStack企业私有云实战全网最佳视频教程_哔哩哔哩_bilibili
一、离线源服务器部署
#配置yum01服务器
hostnamectl set-hostname yum01
sed -i 's/59.251/59.250/g' /etc/sysconfig/network-scripts/ifcfg-ens33
systemctl restart network

cd /etc/yum.repos.d && mkdir backup && mv *.repo backup/
curl -o /etc/yum.repos.d/CentOS-Base.repo https://mirrors.aliyun.com/repo/Centos-7.repo
sed -i -e '/mirrors.cloud.aliyuncs.com/d' -e '/mirrors.aliyuncs.com/d' /etc/yum.repos.d/CentOS-Base.repo
yum -y install centos-release-openstack-train

[ceph]
name=Ceph packages for $basearch
baseurl=http://mirrors.aliyun.com/ceph/rpm-nautilus/el7/x86_64
enabled=1
gpgcheck=0
[ceph-noarch]
name=Ceph noarch packages
baseurl=http://mirrors.aliyun.com/ceph/rpm-nautilus/el7/noarch

enabled=1
gpgcheck=0
[ceph-source]
name=Ceph source packages
baseurl=http://mirrors.aliyun.com/ceph/rpm-nautilus/el7/SRPMS
enabled=1
gpgcheck=0

reposync -n --repoid=base --repoid=updates -p /var/www/html/yumrepos/
reposync -n --repoid=ceph --repoid=ceph-noarch -p /var/www/html/yumrepos/
reposync -n --repoid=centos-openstack-train -p /var/www/html/yumrepos/
reposync -n --repoid=centos-qemu-ev -p /var/www/html/yumrepos/
二、准备工作(所有节点需要执行)
#准备controller/compute服务器
hostnamectl set-hostname controller
sed -i 's/59.251/59.40/g' /etc/sysconfig/network-scripts/ifcfg-ens33
cat <<EOF > /etc/sysconfig/network-scripts/ifcfg-ens34
TYPE=Ethernet
BOOTPROTO=static
DEFROUTE=yes
IPV6INIT=no
NAME=ens34
DEVICE=ens34
ONBOOT=yes
IPADDR=10.168.59.40
NETMASK=255.255.255.0
EOF
systemctl restart network
ping 192.168.59.2

hostnamectl set-hostname compute01
sed -i 's/59.251/59.41/g' /etc/sysconfig/network-scripts/ifcfg-ens33
cat <<EOF > /etc/sysconfig/network-scripts/ifcfg-ens34
TYPE=Ethernet
BOOTPROTO=static
DEFROUTE=yes
IPV6INIT=no
NAME=ens34
DEVICE=ens34
ONBOOT=yes
IPADDR=10.168.59.41
NETMASK=255.255.255.0
EOF
systemctl restart network
ping 192.168.59.2

hostnamectl set-hostname compute02
sed -i 's/59.251/59.42/g' /etc/sysconfig/network-scripts/ifcfg-ens33
cat <<EOF > /etc/sysconfig/network-scripts/ifcfg-ens34
TYPE=Ethernet
BOOTPROTO=static
DEFROUTE=yes
IPV6INIT=no
NAME=ens34
DEVICE=ens34
ONBOOT=yes
IPADDR=10.168.59.42
NETMASK=255.255.255.0
EOF
systemctl restart network
ping 192.168.59.2

ping -c 3 10.168.59.41
ping -c 3 10.168.59.42
ping -c 3 20.168.59.41
ping -c 3 20.168.59.42

#配置hosts文件
cat <<EOF>/etc/hosts
# openstack
192.168.59.40 controller
192.168.59.41 compute01
192.168.59.42 compute02
# cpeh-public
192.168.59.11 ceph01
192.168.59.12 ceph02
192.168.59.13 ceph03
# ceph-cluster
20.168.59.11 ceph01-cluster
20.168.59.12 ceph02-cluster
20.168.59.13 ceph03-cluster
# yum
192.168.59.250 yum01
EOF

#下载离线源
wget -O /etc/yum.repos.d/private.repo http://yum01/private.repo
三、控制节点部署
#controller节点部署
1、安装配置mariadb
yum -y install mariadb mariadb-server python2-PyMySQL
cat >/etc/my.cnf.d/openstack.cnf<<EOF
[mysqld]
bind-address = 0.0.0.0
default-storage-engine = innodb
innodb_file_per_table = on
max_connections = 8192
collation-server = utf8_general_ci
character-set-server = utf8
EOF

sed -ri '/^\[Service\]/a LimitNOFILE=65535\nLimitNPROC=65535' /usr/lib/systemd/system/mariadb.service
systemctl daemon-reload
systemctl enable --now mariadb.service

#先不数据库初始化设置,配置好再做这步
#mysql_secure_installation

#设置数据库的root用户能够远程访问
mysql
use mysql;
update user set Host='%' where User='root' and Host='localhost' and user='root';
flush privileges;
exit

2、安装与配置 rabbitMQ
yum -y install rabbitmq-server
sed -i '/^\[Service\]/a LimitNOFILE=32768'  /usr/lib/systemd/system/rabbitmq-server.service
systemctl daemon-reload
systemctl enable rabbitmq-server.service
systemctl restart rabbitmq-server.service

#此处密码可以设置个变量
rabbitmqctl add_user openstack openstack
rabbitmqctl set_user_tags openstack administrator
rabbitmqctl set_permissions openstack ".*" ".*" ".*"

rabbitmq-plugins enable rabbitmq_management
#网页登录可删除默认的guest用户

3、 Memcache 安装及配置
yum -y install memcached python-memcached
cp /etc/sysconfig/memcached{,.bak}
cat >/etc/sysconfig/memcached<<EOF
PORT="11211"
USER="memcached"
MAXCONN="4096"
CACHESIZE="256"
OPTIONS="-l 0.0.0.0,::1"
#或者这种写法
#OPTIONS="-l 127.0.0.1,::1,controller"
EOF
systemctl enable memcached.service
systemctl restart memcached.service
systemctl status memcached.service

4、 etcd 安装及配置(可选安装)
yum -y install etcd
cp /etc/etcd/etcd.conf{,.bak}
cat >/etc/etcd/etcd.conf<<EOF
#[Member]
ETCD_DATA_DIR="/var/lib/etcd/default.etcd"
ETCD_LISTEN_PEER_URLS="http://192.168.59.40:2380"
ETCD_LISTEN_CLIENT_URLS="http://192.168.59.40:2379"
ETCD_NAME="controller"
#[Clustering]
ETCD_INITIAL_ADVERTISE_PEER_URLS="http://192.168.59.40:2380"
ETCD_ADVERTISE_CLIENT_URLS="http://192.168.59.40:2379"
ETCD_INITIAL_CLUSTER="controller=http://192.168.59.40:2380"
ETCD_INITIAL_CLUSTER_TOKEN="etcd-cluster-01"
ETCD_INITIAL_CLUSTER_STATE="new"
EOF

systemctl enable --now etcd

5、安装 openstack 客户端(所有节点上安装OpenStack 客户端)
yum -y install python-openstackclient

6、安装 keystone(控制节点)
#数据的密码可以设置成变量
mysql
CREATE DATABASE keystone default character set utf8;
GRANT ALL PRIVILEGES ON keystone.* TO 'keystone'@'localhost' IDENTIFIED BY 'openstack';
GRANT ALL PRIVILEGES ON keystone.* TO 'keystone'@'%' IDENTIFIED BY 'openstack';
exit

yum -y --enablerepo=centos-openstack-train install qpid-proton-c-0.26.0-2.el7.x86_64
yum -y install openstack-keystone httpd mod_wsgi

cd /etc/keystone/ && mv keystone.conf keystone.conf.source && cat keystone.conf.source |grep -Ev "^#|^$" > keystone.conf && chown root:keystone keystone.conf

#openstack-utils工具包,进行快速配置可以参考
yum install -y openstack-utils

openstack-config --set  /etc/keystone/keystone.conf database connection mysql+pymysql://keystone:openstack@controller/keystone
openstack-config --set  /etc/keystone/keystone.conf token expiration 86400
openstack-config --set  /etc/keystone/keystone.conf token provider fernet

# 同步 Identity 服务的初始数据到 keystone 库
su -s /bin/sh -c "keystone-manage db_sync" keystone

#初始化 Fernet 密钥存储库
keystone-manage fernet_setup --keystone-user keystone --keystone-group keystone
keystone-manage credential_setup --keystone-user keystone --keystone-group keystone

#执行身份引导服务(会创建 endpoint),此处的密码可以设置成变量(修改--bootstrap-password 后为用户 admin 的密码,此处设置为 openstack2022)
 keystone-manage bootstrap --bootstrap-password openstack2022 \
--bootstrap-admin-url http://controller:5000/v3/ \
--bootstrap-internal-url http://controller:5000/v3/ \
--bootstrap-public-url http://controller:5000/v3/ \
--bootstrap-region-id RegionOne

7、在控制节点(controller)上安装配置Apache服务
yum install -y httpd
#此处的IP或域名可以设置成变量
sed -i "/#ServerName www.example.com:80/a ServerName 192.168.59.40:80" /etc/httpd/conf/httpd.conf

ln -s /usr/share/keystone/wsgi-keystone.conf /etc/httpd/conf.d/
systemctl enable httpd.service
systemctl restart httpd.service

8、设置openstack环境变量
#此处的密码可以设置成变量
cat > /root/admin-openrc.sh <<EOF
export OS_USERNAME=admin
export OS_PASSWORD=openstack2022
export OS_PROJECT_NAME=admin
export OS_USER_DOMAIN_NAME=Default
export OS_PROJECT_DOMAIN_NAME=Default
export OS_AUTH_URL=http://controller:5000/v3
export OS_IDENTITY_API_VERSION=3
export OS_IMAGE_API_VERSION=2
EOF
cd ~
source admin-openrc.sh

#创建 service 项目、user 角色、域,default 域默认已经存在
openstack project create --domain default --description "Service Project" service
openstack role create user

9、安装 placement(控制节点)
mysql
CREATE DATABASE placement default character set utf8;
GRANT ALL PRIVILEGES ON placement.* TO 'placement'@'localhost' IDENTIFIED BY 'openstack';
GRANT ALL PRIVILEGES ON placement.* TO 'placement'@'%' IDENTIFIED BY 'openstack';
exit

#此处密码可以设置成变量
openstack user create --domain default --password openstack2022 placement
openstack role add --project service --user placement admin
openstack service create --name placement --description "Placement API" placement

openstack endpoint create --region RegionOne placement public http://controller:8778
openstack endpoint create --region RegionOne placement internal http://controller:8778
openstack endpoint create --region RegionOne placement admin http://controller:8778

yum -y install openstack-placement-api
cd /etc/placement/ && mv placement.conf placement.conf.source && cat placement.conf.source |grep -Ev "^#|^$" > placement.conf && chown root:placement placement.conf
#此处密码可以设置成变量
openstack-config --set /etc/placement/placement.conf placement_database connection mysql+pymysql://placement:openstack@controller/placement
openstack-config --set /etc/placement/placement.conf api auth_strategy keystone
openstack-config --set /etc/placement/placement.conf keystone_authtoken auth_url http://controller:5000/v3
openstack-config --set /etc/placement/placement.conf keystone_authtoken memcached_servers controller:11211
openstack-config --set /etc/placement/placement.conf keystone_authtoken auth_type password
openstack-config --set /etc/placement/placement.conf keystone_authtoken project_domain_name default
openstack-config --set /etc/placement/placement.conf keystone_authtoken user_domain_name default
openstack-config --set /etc/placement/placement.conf keystone_authtoken project_name service
openstack-config --set /etc/placement/placement.conf keystone_authtoken username placement
#此处密码可以设置成变量
openstack-config --set /etc/placement/placement.conf keystone_authtoken password openstack2022

cp /etc/httpd/conf.d/00-placement-api.conf{,.bak}
sed -i '/ErrorLog \/var\/log\/placement\/placement-api.log/a \  <Directory /usr/bin>\n  <IfVersion >= 2.4>\n  Require all granted\n  </IfVersion>\n  <IfVersion < 2.4>\n  Order allow,deny\n  Allow from all\n  </IfVersion>\n  </Directory>' /etc/httpd/conf.d/00-placement-api.conf

su -s /bin/sh -c "placement-manage db sync" placement

systemctl restart httpd

#安装 pip(如果无外网则跳过该设置,使用离线安装)
#yum install -y epel-release
yum install -y python-pip
#rm -rf /etc/yum.repos.d/epel.repo /etc/yum.repos.d/epel-testing.repo
#配置国内的pip源
cat > /etc/pip.conf <<EOF
[global]
index-url = https://pypi.douban.com/simple/
[install]
trusted-host = https://pypi.douban.com
EOF

10、在控制节点(controller)安装 Glance
mysql
CREATE DATABASE glance default character set utf8;
GRANT ALL PRIVILEGES ON glance.* TO 'glance'@'localhost' IDENTIFIED BY 'openstack';
GRANT ALL PRIVILEGES ON glance.* TO 'glance'@'%' IDENTIFIED BY 'openstack';
exit

#此处密码可以设置成变量
openstack user create --domain default --password openstack2022 glance
openstack role add --project service --user glance admin
openstack service create --name glance --description "OpenStack Image" image

openstack endpoint create --region RegionOne image public http://controller:9292
openstack endpoint create --region RegionOne image internal http://controller:9292
openstack endpoint create --region RegionOne image admin http://controller:9292

yum -y install openstack-glance
cd /etc/glance/ && mv glance-api.conf glance-api.conf.source && cat glance-api.conf.source |grep -Ev "^#|^$" > glance-api.conf && chown root:glance glance-api.conf
openstack-config --set /etc/glance/glance-api.conf DEFAULT show_image_direct_url True
#此处密码可以设置成变量
openstack-config --set /etc/glance/glance-api.conf DEFAULT transport_url rabbit://openstack:openstack@controller
#此处密码可以设置成变量
openstack-config --set /etc/glance/glance-api.conf database connection mysql+pymysql://glance:openstack@controller/glance
openstack-config --set /etc/glance/glance-api.conf keystone_authtoken www_authenticate_uri http://controller:5000
openstack-config --set /etc/glance/glance-api.conf keystone_authtoken auth_url http://controller:5000
openstack-config --set /etc/glance/glance-api.conf keystone_authtoken memcached_servers controller:11211
openstack-config --set /etc/glance/glance-api.conf keystone_authtoken auth_type password
openstack-config --set /etc/glance/glance-api.conf keystone_authtoken project_domain_name Default
openstack-config --set /etc/glance/glance-api.conf keystone_authtoken user_domain_name Default
openstack-config --set /etc/glance/glance-api.conf keystone_authtoken project_name service
openstack-config --set /etc/glance/glance-api.conf keystone_authtoken username glance
#此处密码可以设置成变量
openstack-config --set /etc/glance/glance-api.conf keystone_authtoken password openstack2022
openstack-config --set /etc/glance/glance-api.conf paste_deploy flavor keystone
openstack-config --set /etc/glance/glance-api.conf glance_store stores file,http
openstack-config --set /etc/glance/glance-api.conf glance_store default_store file
openstack-config --set /etc/glance/glance-api.conf glance_store filesystem_store_datadir /var/lib/glance/images/

cd /etc/glance/ && mv glance-registry.conf glance-registry.conf.source && cat glance-registry.conf.source |grep -Ev "^#|^$" > glance-registry.conf&& chown root:glance glance-registry.conf
#此处密码可以设置成变量
openstack-config --set /etc/glance/glance-registry.conf database connection mysql+pymysql://glance:openstack@controller/glance
openstack-config --set /etc/glance/glance-registry.conf keystone_authtoken www_authenticate_uri http://controller:5000
openstack-config --set /etc/glance/glance-registry.conf keystone_authtoken auth_url http://controller:5000
openstack-config --set /etc/glance/glance-registry.conf keystone_authtoken memcached_servers controller:11211
openstack-config --set /etc/glance/glance-registry.conf keystone_authtoken auth_type password
openstack-config --set /etc/glance/glance-registry.conf keystone_authtoken project_domain_name Default
openstack-config --set /etc/glance/glance-registry.conf keystone_authtoken user_domain_name Default

openstack-config --set /etc/glance/glance-registry.conf keystone_authtoken project_name service
openstack-config --set /etc/glance/glance-registry.conf keystone_authtoken username glance
#此处密码可以设置成变量
openstack-config --set /etc/glance/glance-registry.conf keystone_authtoken password openstack2022
openstack-config --set /etc/glance/glance-registry.conf paste_deploy flavor keystone

su -s /bin/sh -c "glance-manage db_sync" glance

systemctl enable --now openstack-glance-api.service openstack-glance-registry.service
systemctl status openstack-glance-api.service openstack-glance-registry.service

#下载测试镜像 cirros 上传到 Glance(官网下载慢,本地下载)
# wget http://download.cirros-cloud.net/0.4.0/cirros-0.4.0-x86_64-disk.img
cd ~
wget --http-user=qwe --http-passwd=qwe http://61.160.213.184/dl/centos/openstack/cirros-0.4.0-x86_64-disk.img
openstack image create "cirros-0.4.0-x86_64" --file cirros-0.4.0-x86_64-disk.img --disk-format qcow2 --container-format bare --public

11、安装配置 Neutron(控制节点)
mysql
CREATE DATABASE neutron default character set utf8;
GRANT ALL PRIVILEGES ON neutron.* TO 'neutron'@'localhost' IDENTIFIED BY 'openstack';
GRANT ALL PRIVILEGES ON neutron.* TO 'neutron'@'%' IDENTIFIED BY 'openstack';
exit

#此处密码可以设置成变量
openstack user create --domain default --password openstack2022 neutron

openstack role add --project service --user neutron admin
openstack service create --name neutron --description "OpenStack Networking" network

openstack endpoint create --region RegionOne network public http://controller:9696
openstack endpoint create --region RegionOne network internal http://controller:9696
openstack endpoint create --region RegionOne network admin http://controller:9696

#采用 Provider-LinuxBridge 模式
yum -y install openstack-neutron openstack-neutron-ml2 openstack-neutron-linuxbridge ebtables
cd /etc/neutron/ && mv neutron.conf neutron.conf.source && cat neutron.conf.source |grep -Ev "^#|^$" > neutron.conf && chown root:neutron neutron.conf
openstack-config --set /etc/neutron/neutron.conf DEFAULT core_plugin ml2
openstack-config --set /etc/neutron/neutron.conf DEFAULT service_plugins router
#此处密码可以设置成变量
openstack-config --set /etc/neutron/neutron.conf DEFAULT transport_url rabbit://openstack:openstack@controller
openstack-config --set /etc/neutron/neutron.conf DEFAULT auth_strategy keystone
openstack-config --set /etc/neutron/neutron.conf DEFAULT notify_nova_on_port_status_changes true
openstack-config --set /etc/neutron/neutron.conf DEFAULT notify_nova_on_port_data_changes true
openstack-config --set /etc/neutron/neutron.conf DEFAULT allow_overlapping_ips true
#此处密码可以设置成变量
openstack-config --set /etc/neutron/neutron.conf database connection mysql+pymysql://neutron:openstack@controller/neutron
openstack-config --set /etc/neutron/neutron.conf keystone_authtoken www_authenticate_uri http://controller:5000
openstack-config --set /etc/neutron/neutron.conf keystone_authtoken auth_url http://controller:5000
openstack-config --set /etc/neutron/neutron.conf keystone_authtoken memcached_servers controller:11211
openstack-config --set /etc/neutron/neutron.conf keystone_authtoken auth_type password
openstack-config --set /etc/neutron/neutron.conf keystone_authtoken project_domain_name default
openstack-config --set /etc/neutron/neutron.conf keystone_authtoken user_domain_name default
openstack-config --set /etc/neutron/neutron.conf keystone_authtoken project_name service
openstack-config --set /etc/neutron/neutron.conf keystone_authtoken username neutron
#此处密码可以设置成变量
openstack-config --set /etc/neutron/neutron.conf keystone_authtoken password openstack2022
openstack-config --set /etc/neutron/neutron.conf keystone_authtoken token_cache_time 3600
openstack-config --set /etc/neutron/neutron.conf oslo_concurrency lock_path /var/lib/neutron/tmp

#此处密码可以设置成变量
cat >>/etc/neutron/neutron.conf<<EOF
[nova]
auth_url = http://controller:5000
auth_type = password
project_domain_name = default
user_domain_name = default
region_name = RegionOne
project_name = service
username = nova
password = openstack2022
EOF

cd /etc/neutron/plugins/ml2 && mv ml2_conf.ini ml2_conf.ini.source && cat ml2_conf.ini.source |grep -Ev "^#|^$" > ml2_conf.ini && chown root:neutron ml2_conf.ini
openstack-config --set /etc/neutron/plugins/ml2/ml2_conf.ini ml2 type_drivers flat,vlan,vxlan
openstack-config --set /etc/neutron/plugins/ml2/ml2_conf.ini ml2 tenant_network_types vxlan
openstack-config --set /etc/neutron/plugins/ml2/ml2_conf.ini ml2 mechanism_drivers linuxbridge,l2population
openstack-config --set /etc/neutron/plugins/ml2/ml2_conf.ini ml2 extension_drivers port_security
openstack-config --set /etc/neutron/plugins/ml2/ml2_conf.ini ml2_type_flat flat_networks provider
openstack-config --set /etc/neutron/plugins/ml2/ml2_conf.ini ml2_type_vlan network_vlan_ranges provider
openstack-config --set /etc/neutron/plugins/ml2/ml2_conf.ini ml2_type_vxlan vni_ranges 1:3000
openstack-config --set /etc/neutron/plugins/ml2/ml2_conf.ini securitygroup enable_ipset true

cd /etc/neutron/plugins/ml2 && mv linuxbridge_agent.ini linuxbridge_agent.ini.source && cat linuxbridge_agent.ini.source |grep -Ev "^#|^$" >linuxbridge_agent.ini && chown root:neutron linuxbridge_agent.ini
#此处的网卡名可以设置变量
openstack-config --set /etc/neutron/plugins/ml2/linuxbridge_agent.ini linux_bridge physical_interface_mappings provider:ens33
openstack-config --set /etc/neutron/plugins/ml2/linuxbridge_agent.ini vxlan enable_vxlan true
#此处要配置内网IP地址,可以设置成变量(给 vxlan 专用,并且要配置 IP 地址(不需要配置网关,配置 IP 后,各节点可以使用对应 IP ping 通))
openstack-config --set /etc/neutron/plugins/ml2/linuxbridge_agent.ini vxlan  local_ip 10.168.59.40
openstack-config --set /etc/neutron/plugins/ml2/linuxbridge_agent.ini vxlan  l2_population true
openstack-config --set /etc/neutron/plugins/ml2/linuxbridge_agent.ini securitygroup enable_security_group true
openstack-config --set /etc/neutron/plugins/ml2/linuxbridge_agent.ini securitygroup firewall_driver neutron.agent.linux.iptables_firewall.IptablesFirewallDriver

#修改内核配置文件/etc/sysctl.conf,确保系统内核支持网桥过滤器
cat >>/etc/sysctl.conf<<EOF
net.bridge.bridge-nf-call-iptables = 1
net.bridge.bridge-nf-call-ip6tables = 1
EOF
#执行以下命令,添加网桥过滤器,并设置开机加载
modprobe br_netfilter
sysctl -p
sed -i '$amodprobe br_netfilter' /etc/rc.local
chmod +x /etc/rc.d/rc.local

cd /etc/neutron/ && mv dhcp_agent.ini dhcp_agent.ini.source && cat dhcp_agent.ini.source |grep -Ev "^#|^$" > dhcp_agent.ini && chown root:neutron dhcp_agent.ini
openstack-config --set /etc/neutron//dhcp_agent.ini DEFAULT interface_driver linuxbridge
openstack-config --set /etc/neutron//dhcp_agent.ini DEFAULT dhcp_driver neutron.agent.linux.dhcp.Dnsmasq
openstack-config --set /etc/neutron//dhcp_agent.ini DEFAULT enable_isolated_metadata true

cd /etc/neutron/ && mv metadata_agent.ini metadata_agent.ini.source && cat metadata_agent.ini.source |grep -Ev "^#|^$" > metadata_agent.ini&& chown root:neutron metadata_agent.ini
openstack-config --set /etc/neutron/metadata_agent.ini DEFAULT nova_metadata_host controller
#此处密码可以设置成变量,要与下面的metadata_proxy_shared_secret密码保持一致
openstack-config --set /etc/neutron/metadata_agent.ini DEFAULT metadata_proxy_shared_secret openstack2022

cd /etc/neutron/ && mv l3_agent.ini l3_agent.ini.source && cat l3_agent.ini.source |grep -Ev "^#|^$" > l3_agent.ini && chown root:neutron l3_agent.ini
openstack-config --set /etc/neutron/l3_agent.ini DEFAULT interface_driver linuxbridge
openstack-config --set /etc/neutron/l3_agent.ini DEFAULT external_network_bridge


##########################################预先安装##########################################
#配置controller计算服务(nova)以使用 Neutron 网络
yum -y install openstack-nova-api openstack-nova-conductor openstack-nova-novncproxy openstack-nova-scheduler
cd /etc/nova/ && mv nova.conf nova.conf.source && cat nova.conf.source |grep -Ev "^#|^$" > nova.conf && chown root:nova nova.conf
openstack-config --set /etc/nova/nova.conf neutron url http://controller:9696
openstack-config --set /etc/nova/nova.conf neutron auth_url http://controller:5000
openstack-config --set /etc/nova/nova.conf neutron auth_type password
openstack-config --set /etc/nova/nova.conf neutron project_domain_name default
openstack-config --set /etc/nova/nova.conf neutron user_domain_name default
openstack-config --set /etc/nova/nova.conf neutron region_name RegionOne
openstack-config --set /etc/nova/nova.conf neutron project_name service
openstack-config --set /etc/nova/nova.conf neutron username neutron
#此处密码可以设置成变量
openstack-config --set /etc/nova/nova.conf neutron password openstack2022
openstack-config --set /etc/nova/nova.conf neutron service_metadata_proxy true
#此处密码可以设置成变量,要与上面的metadata_proxy_shared_secret密码保持一致
openstack-config --set /etc/nova/nova.conf neutron metadata_proxy_shared_secret openstack2022
##########################################预先安装##########################################

ln -s /etc/neutron/plugins/ml2/ml2_conf.ini /etc/neutron/plugin.ini

su -s /bin/sh -c "neutron-db-manage --config-file /etc/neutron/neutron.conf --config-file /etc/neutron/plugins/ml2/ml2_conf.ini upgrade head" neutron

systemctl enable neutron-server.service neutron-linuxbridge-agent.service neutron-dhcp-agent.service neutron-metadata-agent.service neutron-l3-agent.service
systemctl restart neutron-server.service neutron-linuxbridge-agent.service neutron-dhcp-agent.service neutron-metadata-agent.service neutron-l3-agent.service
systemctl status neutron-server.service neutron-linuxbridge-agent.service neutron-dhcp-agent.service neutron-metadata-agent.service neutron-l3-agent.service

12、在控制节点(controller)安装 nova 服务
mysql
CREATE DATABASE nova_api default character set utf8;
CREATE DATABASE nova default character set utf8;
CREATE DATABASE nova_cell0 default character set utf8;
GRANT ALL PRIVILEGES ON nova_api.* TO 'nova'@'localhost' IDENTIFIED BY 'openstack';
GRANT ALL PRIVILEGES ON nova_api.* TO 'nova'@'%' IDENTIFIED BY 'openstack';
GRANT ALL PRIVILEGES ON nova.* TO 'nova'@'localhost' IDENTIFIED BY 'openstack';
GRANT ALL PRIVILEGES ON nova.* TO 'nova'@'%' IDENTIFIED BY 'openstack';
GRANT ALL PRIVILEGES ON nova_cell0.* TO 'nova'@'localhost' IDENTIFIED BY 'openstack';
GRANT ALL PRIVILEGES ON nova_cell0.* TO 'nova'@'%' IDENTIFIED BY 'openstack';
exit

#此处密码可以设置成变量
openstack user create --domain default --password openstack2022 nova
openstack role add --project service --user nova admin
openstack service create --name nova --description "OpenStack Compute" compute

openstack endpoint create --region RegionOne compute public http://controller:8774/v2.1
openstack endpoint create --region RegionOne compute internal http://controller:8774/v2.1
openstack endpoint create --region RegionOne compute admin http://controller:8774/v2.1

yum -y install openstack-nova-api openstack-nova-conductor openstack-nova-novncproxy openstack-nova-scheduler
cp /etc/nova/nova.conf{,.bak}
openstack-config --set /etc/nova/nova.conf DEFAULT enabled_apis osapi_compute,metadata
#此处密码可以设置成变量

openstack-config --set /etc/nova/nova.conf DEFAULT transport_url rabbit://openstack:openstack@controller
#此处的IP为控制节点的公网IP,可以设置成变量

openstack-config --set /etc/nova/nova.conf DEFAULT my_ip 192.168.59.40
openstack-config --set /etc/nova/nova.conf DEFAULT use_neutron true
openstack-config --set /etc/nova/nova.conf DEFAULT firewall_driver nova.virt.firewall.NoopFirewallDriver
openstack-config --set /etc/nova/nova.conf DEFAULT allow_resize_to_same_host true
#此处密码可以设置成变量
openstack-config --set /etc/nova/nova.conf api_database connection mysql+pymysql://nova:openstack@controller/nova_api
#此处密码可以设置成变量
openstack-config --set /etc/nova/nova.conf database connection mysql+pymysql://nova:openstack@controller/nova
openstack-config --set /etc/nova/nova.conf api auth_strategy keystone
openstack-config --set /etc/nova/nova.conf api token_cache_time 3600
openstack-config --set /etc/nova/nova.conf keystone_authtoken auth_url http://controller:5000/v3
openstack-config --set /etc/nova/nova.conf keystone_authtoken memcached_servers controller:11211
openstack-config --set /etc/nova/nova.conf keystone_authtoken auth_type password
openstack-config --set /etc/nova/nova.conf keystone_authtoken project_domain_name Default
openstack-config --set /etc/nova/nova.conf keystone_authtoken user_domain_name Default
openstack-config --set /etc/nova/nova.conf keystone_authtoken project_name service
openstack-config --set /etc/nova/nova.conf keystone_authtoken username nova
#此处密码可以设置成变量
openstack-config --set /etc/nova/nova.conf keystone_authtoken password openstack2022
openstack-config --set /etc/nova/nova.conf keystone_authtoken token_cache_time 3600
openstack-config --set /etc/nova/nova.conf vnc enabled true

#此处注意,$my_ip要加\,才能保持原样写到配置文件内
openstack-config --set /etc/nova/nova.conf vnc server_listen \$my_ip
openstack-config --set /etc/nova/nova.conf vnc server_proxyclient_address \$my_ip
openstack-config --set /etc/nova/nova.conf vnc novncproxy_host 0.0.0.0
openstack-config --set /etc/nova/nova.conf vnc novncproxy_port 6080
#此处的IP为控制节点的公网IP或者域名,可以设置成变量
openstack-config --set /etc/nova/nova.conf vnc novncproxy_base_url http://192.168.59.40:6080/vnc_auto.html
openstack-config --set /etc/nova/nova.conf glance api_servers http://controller:9292
openstack-config --set /etc/nova/nova.conf oslo_concurrency lock_path /var/lib/nova/tmp
openstack-config --set /etc/nova/nova.conf placement region_name RegionOne
openstack-config --set /etc/nova/nova.conf placement project_domain_name Default
openstack-config --set /etc/nova/nova.conf placement project_name service
openstack-config --set /etc/nova/nova.conf placement auth_type password
openstack-config --set /etc/nova/nova.conf placement user_domain_name Default
openstack-config --set /etc/nova/nova.conf placement auth_url http://controller:5000/v3
openstack-config --set /etc/nova/nova.conf placement username placement
#此处密码可以设置成变量
openstack-config --set /etc/nova/nova.conf placement password openstack2022
openstack-config --set /etc/nova/nova.conf scheduler discover_hosts_in_cells_interval 180

su -s /bin/sh -c "nova-manage api_db sync" nova
su -s /bin/sh -c "nova-manage cell_v2 map_cell0" nova
su -s /bin/sh -c "nova-manage cell_v2 create_cell --name=cell1 --verbose" nova
su -s /bin/sh -c "nova-manage db sync" nova

systemctl enable openstack-nova-api.service openstack-nova-scheduler.service openstack-nova-conductor.service openstack-nova-novncproxy.service
systemctl restart openstack-nova-api.service openstack-nova-scheduler.service openstack-nova-conductor.service openstack-nova-novncproxy.service
systemctl status openstack-nova-api.service openstack-nova-scheduler.service openstack-nova-conductor.service openstack-nova-novncproxy.service

13、在控制节点(controller)安装 Horizon 服务
yum -y install openstack-dashboard
\cp /etc/openstack-dashboard/local_settings{,.bak}
egrep -v '^$|#' /etc/openstack-dashboard/local_settings.bak >/etc/openstack-dashboard/local_settings
sed -i '/OPENSTACK_HOST =/c  OPENSTACK_HOST = "controller"' /etc/openstack-dashboard/local_settings
sed -i "/ALLOWED_HOSTS =/c  ALLOWED_HOSTS = ['*', ]" /etc/openstack-dashboard/local_settings
sed -i '/OPENSTACK_KEYSTONE_URL/a OPENSTACK_KEYSTONE_MULTIDOMAIN_SUPPORT = True' /etc/openstack-dashboard/local_settings
sed -i "/ALLOWED_HOSTS =/a  SESSION_ENGINE = 'django.contrib.sessions.backends.cache'" /etc/openstack-dashboard/local_settings
#sed -i "/ALLOWED_HOSTS =/a  SESSION_ENGINE = 'django.contrib.sessions.backends.file'" /etc/openstack-dashboard/local_settings
sed -i "/'enable_ipv6': True/c \ \ \ \ 'enable_ipv6': False," /etc/openstack-dashboard/local_settings
sed -i '/TIME_ZONE =/c TIME_ZONE = "Asia/Shanghai"' /etc/openstack-dashboard/local_settings

cat >>/etc/openstack-dashboard/local_settings<<'EOF'
CACHES = {
    'default': {
         'BACKEND': 'django.core.cache.backends.memcached.MemcachedCache',
         'LOCATION': 'controller:11211',
    }
}

OPENSTACK_API_VERSIONS = {
    "identity": 3,
    "image": 2,
    "volume": 2,
}

OPENSTACK_KEYSTONE_DEFAULT_DOMAIN = "Default"
OPENSTACK_KEYSTONE_DEFAULT_ROLE = "user"
WEBROOT = '/dashboard/'
SESSION_TIMEOUT = 86400

OPENSTACK_CINDER_FEATURES = {
'enable_backup': True,
}
EOF

\cp /etc/httpd/conf.d/openstack-dashboard.conf{,.bak}
sed -ri '4i WSGIApplicationGroup %{GLOBAL}' /etc/httpd/conf.d/openstack-dashboard.conf
chown -R apache:apache /usr/share/openstack-dashboard/
systemctl restart httpd.service memcached.service
四、部署计算节点(compute)
1、在计算节点(compute)安装 nova 服务
#在计算节点(compute01、compute02)安装 Neutron 服务,同时配置支持 vxlan(由于 neutron 和 nova 之间有相互调用配置,此处将计算服务一并安装)
yum --enablerepo=centos-openstack-train install -y qpid-proton-c-0.26.0-2.el7.x86_64
yum -y install openstack-nova-compute
yum -y install openstack-neutron-linuxbridge ebtables ipset
#安装openstack-utils工具包
yum install -y openstack-utils
cd /etc/neutron/ && mv neutron.conf neutron.conf.source && cat neutron.conf.source |grep -Ev "^#|^$" > neutron.conf && chown root:neutron neutron.conf
#此处的密码可以设置成变量
openstack-config --set /etc/neutron/neutron.conf DEFAULT transport_url rabbit://openstack:openstack@controller
openstack-config --set /etc/neutron/neutron.conf DEFAULT auth_strategy keystone
openstack-config --set /etc/neutron/neutron.conf keystone_authtoken www_authenticate_uri http://controller:5000
openstack-config --set /etc/neutron/neutron.conf keystone_authtoken auth_url http://controller:5000
openstack-config --set /etc/neutron/neutron.conf keystone_authtoken memcached_servers controller:11211
openstack-config --set /etc/neutron/neutron.conf keystone_authtoken auth_type password
openstack-config --set /etc/neutron/neutron.conf keystone_authtoken project_domain_name default
openstack-config --set /etc/neutron/neutron.conf keystone_authtoken user_domain_name default
openstack-config --set /etc/neutron/neutron.conf keystone_authtoken project_name service
openstack-config --set /etc/neutron/neutron.conf keystone_authtoken username neutron
#此处的密码可以设置成变量
openstack-config --set /etc/neutron/neutron.conf keystone_authtoken password openstack2022
openstack-config --set /etc/neutron/neutron.conf keystone_authtoken token_cache_time 3600
openstack-config --set /etc/neutron/neutron.conf oslo_concurrency lock_path /var/lib/neutron/tmp
cd /etc/neutron/plugins/ml2 && mv linuxbridge_agent.ini linuxbridge_agent.ini.source && cat linuxbridge_agent.ini.source |grep -Ev "^#|^$" >linuxbridge_agent.ini && chown root:neutron linuxbridge_agent.ini
#此处的网卡名可以设置成变量
openstack-config --set /etc/neutron/plugins/ml2/linuxbridge_agent.ini linux_bridge physical_interface_mappings provider:ens33
openstack-config --set /etc/neutron/plugins/ml2/linuxbridge_agent.ini vxlan enable_vxlan true
#此处的内网IP可以设置成变量
openstack-config --set /etc/neutron/plugins/ml2/linuxbridge_agent.ini vxlan local_ip 10.168.59.41
openstack-config --set /etc/neutron/plugins/ml2/linuxbridge_agent.ini vxlan l2_population true
openstack-config --set /etc/neutron/plugins/ml2/linuxbridge_agent.ini securitygroup firewall_driver neutron.agent.linux.iptables_firewall.IptablesFirewallDriver
openstack-config --set /etc/neutron/plugins/ml2/linuxbridge_agent.ini securitygroup enable_security_group True
cat >>/etc/sysctl.conf<<EOF
net.bridge.bridge-nf-call-iptables = 1
net.bridge.bridge-nf-call-ip6tables = 1
EOF
modprobe br_netfilter
sysctl -p
sed -i '$amodprobe br_netfilter' /etc/rc.local
chmod +x /etc/rc.d/rc.local
systemctl enable neutron-linuxbridge-agent.service
systemctl restart neutron-linuxbridge-agent.service在控制节点执行以下操作进行验证:列出成功启动的 Neutron 代理
openstack network agent list
2、在计算节点(compute)安装 nova 服务
#在计算节点(compute01、compute02)安装配置
yum -y install openstack-nova-compute
cd /etc/nova/ && mv nova.conf nova.conf.source && cat nova.conf.source |grep -Ev "^#|^$" > nova.conf && chown nova:root nova.conf
openstack-config --set /etc/nova/nova.conf DEFAULT enabled_apis osapi_compute,metadata
#此处密码可以设置成变量
openstack-config --set /etc/nova/nova.conf DEFAULT transport_url rabbit://openstack:openstack@controller
#此处是计算节点的公网IP地址可以设置成变量
openstack-config --set /etc/nova/nova.conf DEFAULT my_ip 192.168.59.41
openstack-config --set /etc/nova/nova.conf DEFAULT use_neutron true
openstack-config --set /etc/nova/nova.conf DEFAULT firewall_driver nova.virt.firewall.NoopFirewallDriver
openstack-config --set /etc/nova/nova.conf api auth_strategy keystone
openstack-config --set /etc/nova/nova.conf keystone_authtoken auth_url http://controller:5000/v3
openstack-config --set /etc/nova/nova.conf keystone_authtoken memcached_servers controller:11211
openstack-config --set /etc/nova/nova.conf keystone_authtoken auth_type password
openstack-config --set /etc/nova/nova.conf keystone_authtoken project_domain_name Default
openstack-config --set /etc/nova/nova.conf keystone_authtoken user_domain_name Default
openstack-config --set /etc/nova/nova.conf keystone_authtoken project_name service
openstack-config --set /etc/nova/nova.conf keystone_authtoken username nova
#此处密码可以设置成变量
openstack-config --set /etc/nova/nova.conf keystone_authtoken password openstack2022
openstack-config --set /etc/nova/nova.conf keystone_authtoken token_cache_time 3600
openstack-config --set /etc/nova/nova.conf neutron url http://controller:9696
openstack-config --set /etc/nova/nova.conf neutron auth_url http://controller:5000/v3
openstack-config --set /etc/nova/nova.conf neutron auth_type password
openstack-config --set /etc/nova/nova.conf neutron project_domain_name default
openstack-config --set /etc/nova/nova.conf neutron user_domain_name default
openstack-config --set /etc/nova/nova.conf neutron region_name RegionOne
openstack-config --set /etc/nova/nova.conf neutron project_name service
openstack-config --set /etc/nova/nova.conf neutron username neutron
#此处密码可以设置成变量
openstack-config --set /etc/nova/nova.conf neutron password openstack2022
openstack-config --set /etc/nova/nova.conf vnc enabled true
openstack-config --set /etc/nova/nova.conf vnc server_listen 0.0.0.0
openstack-config --set /etc/nova/nova.conf vnc server_proxyclient_address \$my_ip
#此处是控制节点的公网IP或域名可以设置成变量
openstack-config --set /etc/nova/nova.conf vnc novncproxy_base_url http://192.168.59.40:6080/vnc_auto.html
openstack-config --set /etc/nova/nova.conf vnc vncserver_proxyclient_address \$my_ip
openstack-config --set /etc/nova/nova.conf glance api_servers http://controller:9292
openstack-config --set /etc/nova/nova.conf oslo_concurrency lock_path /var/lib/nova/tmp
openstack-config --set /etc/nova/nova.conf placement region_name RegionOne
openstack-config --set /etc/nova/nova.conf placement project_domain_name Default
openstack-config --set /etc/nova/nova.conf placement project_name service
openstack-config --set /etc/nova/nova.conf placement auth_type password
openstack-config --set /etc/nova/nova.conf placement user_domain_name Default
openstack-config --set /etc/nova/nova.conf placement auth_url http://controller:5000/v3
openstack-config --set /etc/nova/nova.conf placement username placement
#此处密码可以设置成变量
openstack-config --set /etc/nova/nova.conf placement password openstack2022
openstack-config --set /etc/nova/nova.conf scheduler discover_hosts_in_cells_interval 180
# 虚拟机模拟 openstack 可能需要将 virt_type 设置为 qemu,否则创建虚拟机后,一直停在 GRUB Loading stage2
openstack-config --set /etc/nova/nova.conf libvirt virt_type kvm
openstack-config --set /etc/nova/nova.conf libvirt num_pcie_ports 10
yum -y install qemu-kvm-common-ev qemu-kvm-tools qemu-kvm-ev libvirt-daemon-kvm qemu-guest-agent qemu-img-ev
cp /etc/libvirt/libvirtd.conf{,.bak}
cat >/etc/libvirt/libvirtd.conf<<'EOF'
listen_tls = 0
listen_tcp = 1
tcp_port = "16509"
#此处为计算节点的公网IP地址,可以设置成变量
listen_addr = "192.168.59.41"
auth_tcp = "none"
EOF
cp /etc/sysconfig/libvirtd{,.bak}
cat >/etc/sysconfig/libvirtd<<'EOF'
LIBVIRTD_ARGS="--listen"
EOF
systemctl enable libvirtd.service openstack-nova-compute.service
systemctl restart libvirtd.service openstack-nova-compute.service
systemctl status libvirtd.service openstack-nova-compute.service
在控制节点执行以下操作进行验证:查看计算服务组件状态
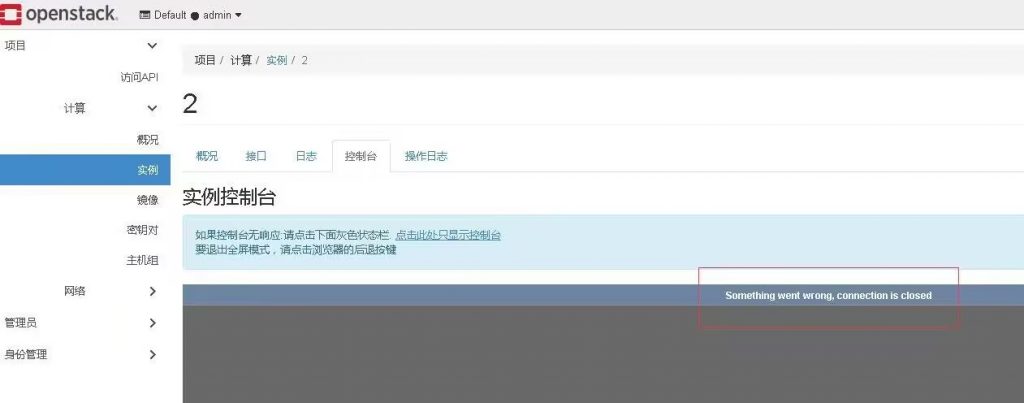
openstack compute service listnovnc打不开,后测试是浏览器问题,换成了火狐浏览器打开正常

五、cinder部署与安装
1、控制节点上安装部署
#################################################################################
#创建rabbitmq用户openstack的密码
rabbitmq_user_pw=9b01ab2815be2db0f8cc
#控制节点的公网IP
controller_public_ip=192.168.59.40
#控制节点的内网IP
controller_provide_ip=10.168.59.40
#控制节点公网网卡名
controller_public_name=ens33
#数据库用户密码
mysql_user_pw=694aef5848517429810d
#openstack组件用户密码
openstack_user_pw=96ab95518e97bebc8c27
#################################################################################

mysql -uroot -e "CREATE DATABASE cinder default character set utf8;"
mysql -uroot -e "GRANT ALL PRIVILEGES ON cinder.* TO 'cinder'@'localhost' IDENTIFIED BY '$mysql_user_pw';"
mysql -uroot -e "GRANT ALL PRIVILEGES ON cinder.* TO 'cinder'@'%' IDENTIFIED BY '$mysql_user_pw';"
cd ~
source admin-openrc.sh
openstack user create --domain default --password $openstack_user_pw cinder
openstack role add --project service --user cinder admin
openstack service create --name cinderv2 --description "OpenStack Block Storage" volumev2
openstack service create --name cinderv3 --description "OpenStack Block Storage" volumev3
openstack endpoint create --region RegionOne volumev2 public http://controller:8776/v2/%\(project_id\)s
openstack endpoint create --region RegionOne volumev2 internal http://controller:8776/v2/%\(project_id\)s
openstack endpoint create --region RegionOne volumev2 admin http://controller:8776/v2/%\(project_id\)s
openstack endpoint create --region RegionOne volumev3 public http://controller:8776/v3/%\(project_id\)s
openstack endpoint create --region RegionOne volumev3 internal http://controller:8776/v3/%\(project_id\)s
openstack endpoint create --region RegionOne volumev3 admin http://controller:8776/v3/%\(project_id\)s
yum -y install openstack-cinder
cd /etc/cinder/ && mv cinder.conf cinder.conf.source && cat cinder.conf.source |grep -Ev "^#|^$" > cinder.conf && chown cinder:root cinder.conf
openstack-config --set /etc/cinder/cinder.conf DEFAULT transport_url rabbit://openstack:${rabbitmq_user_pw}@controller
openstack-config --set /etc/cinder/cinder.conf DEFAULT auth_strategy keystone
openstack-config --set /etc/cinder/cinder.conf DEFAULT my_ip $controller_public_ip
#修改默认的卷类型(原名:__DEFAULT__),记得修改cinder数据库volume_types
openstack-config --set /etc/cinder/cinder.conf DEFAULT default_volume_type hdd
openstack-config --set /etc/cinder/cinder.conf database connection mysql+pymysql://cinder:${mysql_user_pw}@controller/cinder
openstack-config --set /etc/cinder/cinder.conf keystone_authtoken www_authenticate_uri http://controller:5000
openstack-config --set /etc/cinder/cinder.conf keystone_authtoken auth_url http://controller:5000/v3
openstack-config --set /etc/cinder/cinder.conf keystone_authtoken memcached_servers controller:11211
openstack-config --set /etc/cinder/cinder.conf keystone_authtoken auth_type password
openstack-config --set /etc/cinder/cinder.conf keystone_authtoken project_domain_name default
openstack-config --set /etc/cinder/cinder.conf keystone_authtoken user_domain_name default
openstack-config --set /etc/cinder/cinder.conf keystone_authtoken project_name service
openstack-config --set /etc/cinder/cinder.conf keystone_authtoken username cinder
openstack-config --set /etc/cinder/cinder.conf keystone_authtoken password $openstack_user_pw
openstack-config --set /etc/cinder/cinder.conf oslo_concurrency lock_path /var/lib/cinder/tmp
openstack-config --set /etc/cinder/cinder.conf cinder os_region_name RegionOne
su -s /bin/sh -c "cinder-manage db sync" cinder
systemctl restart openstack-nova-api.service
systemctl enable openstack-cinder-api.service openstack-cinder-scheduler.service
systemctl restart openstack-cinder-api.service openstack-cinder-scheduler.service
systemctl status openstack-cinder-api.service openstack-cinder-scheduler.service
控制节点 验证cinder-scheduler,状态为 up 即正常
openstack volume service list
2、存储节点上安装部署cinder
#################################################################################
#创建rabbitmq用户openstack的密码
rabbitmq_user_pw=9b01ab2815be2db0f8cc
#存储节点的公网IP
cinder_public_ip=192.168.59.41
#数据库用户密码
mysql_user_pw=694aef5848517429810d
#openstack组件用户密码
openstack_user_pw=96ab95518e97bebc8c27
#################################################################################
#cinder 在存储节点上运行的服务是:cinder-volume,当然其依赖 LVM、target 服务
yum -y install lvm2 device-mapper-persistent-data
systemctl enable --now lvm2-lvmetad.service
#分别在计算节点 compute01、compute02 规划了 1 个 100GB 的硬盘用作虚机存储,在系统上对应是/dev/sdb
pvcreate /dev/sdb
vgcreate cinder-volumes /dev/sdb
#说明:不同存储节点上相同用途的 VG 名称设置成相同,因为 cinder.conf 中需要指定 volume_group,另外 volume_backend_name 也可以设置成相同。
#此处接受sda设备是因为做此系统使用的是lvm分区,不接受重启系统就崩了。
sed -i '141a \ \ \ \ \ \ \ \ filter = [ "a/sda/","a/sdb/","r/.*/" ]' /etc/lvm/lvm.conf
yum -y install openstack-cinder targetcli python-keystone
cd /etc/cinder/ && mv cinder.conf cinder.conf.source && cat cinder.conf.source |grep -Ev "^#|^$" > cinder.conf && chown cinder:root cinder.conf
openstack-config --set /etc/cinder/cinder.conf DEFAULT transport_url rabbit://openstack:${rabbitmq_user_pw}@controller
openstack-config --set /etc/cinder/cinder.conf DEFAULT auth_strategy keystone
#配置 my_ip 为为存储节点上管理网络接口的 IP 地址(公网)
openstack-config --set /etc/cinder/cinder.conf DEFAULT my_ip $cinder_public_ip
#启用 LVM 后端,这里的 lvm 对应下方的[lvm]块名称,可以自定义
openstack-config --set /etc/cinder/cinder.conf DEFAULT enabled_backends lvm
openstack-config --set /etc/cinder/cinder.conf DEFAULT glance_api_servers http://controller:9292
openstack-config --set /etc/cinder/cinder.conf database connection mysql+pymysql://cinder:${mysql_user_pw}@controller/cinder
openstack-config --set /etc/cinder/cinder.conf keystone_authtoken www_authenticate_uri http://controller:5000
openstack-config --set /etc/cinder/cinder.conf keystone_authtoken auth_url http://controller:5000/v3
openstack-config --set /etc/cinder/cinder.conf keystone_authtoken memcached_servers controller:11211
openstack-config --set /etc/cinder/cinder.conf keystone_authtoken auth_type password
openstack-config --set /etc/cinder/cinder.conf keystone_authtoken project_domain_name default
openstack-config --set /etc/cinder/cinder.conf keystone_authtoken user_domain_name default
openstack-config --set /etc/cinder/cinder.conf keystone_authtoken project_name service
openstack-config --set /etc/cinder/cinder.conf keystone_authtoken username cinder
openstack-config --set /etc/cinder/cinder.conf keystone_authtoken password $openstack_user_pw
openstack-config --set /etc/cinder/cinder.conf oslo_concurrency lock_path /var/lib/cinder/tmp
cat >>/etc/cinder/cinder.conf<<EOF
[lvm]
volume_driver = cinder.volume.drivers.lvm.LVMVolumeDriver
# volume_group 对应前面创建的 VG 名字
volume_group = cinder-volumes
target_protocol = iscsi
target_helper = lioadm
#volume_backend_name用于卷类型的扩展规格对应的键,值对应的就是卷组名,建议和同类型的存储的卷组名和后端存储名不要一样
volume_backend_name = cinder-volumes
EOF
systemctl enable openstack-cinder-volume.service target.service
systemctl restart openstack-cinder-volume.service target.service
在控制节点(controller)进行验证
openstack volume service list
以下是命令集合:
控制节点执行命令:
#################################################################################
#创建rabbitmq用户openstack的密码
rabbitmq_user_pw=9b01ab2815be2db0f8cc
#控制节点的公网IP
controller_public_ip=192.168.59.40
#控制节点的内网IP
controller_provide_ip=10.168.59.40
#控制节点公网网卡名
controller_public_name=ens33
#数据库用户密码
mysql_user_pw=694aef5848517429810d
#openstack组件用户密码
openstack_user_pw=96ab95518e97bebc8c27
#################################################################################

yum -y install mariadb mariadb-server python2-PyMySQL
cat >/etc/my.cnf.d/openstack.cnf<<EOF
[mysqld]
bind-address = 0.0.0.0
default-storage-engine = innodb
innodb_file_per_table = on
max_connections = 8192
collation-server = utf8_general_ci
character-set-server = utf8
EOF
sed -ri '/^\[Service\]/a LimitNOFILE=65535\nLimitNPROC=65535' /usr/lib/systemd/system/mariadb.service
systemctl daemon-reload
systemctl enable --now mariadb.service
yum -y install rabbitmq-server
sed -i '/^\[Service\]/a LimitNOFILE=32768'  /usr/lib/systemd/system/rabbitmq-server.service
systemctl daemon-reload
systemctl enable rabbitmq-server.service
systemctl restart rabbitmq-server.service
#此处密码可以设置个变量
rabbitmqctl add_user openstack $rabbitmq_user_pw
rabbitmqctl set_user_tags openstack administrator
rabbitmqctl set_permissions openstack ".*" ".*" ".*"
rabbitmq-plugins enable rabbitmq_management
yum -y install memcached python-memcached
cp /etc/sysconfig/memcached{,.bak}
cat >/etc/sysconfig/memcached<<EOF
PORT="11211"
USER="memcached"
MAXCONN="4096"
CACHESIZE="256"
OPTIONS="-l 0.0.0.0,::1"
EOF
systemctl enable memcached.service
systemctl restart memcached.service
systemctl status memcached.service
yum -y install etcd
cp /etc/etcd/etcd.conf{,.bak}
#控制节点的公网IP可以设置成变量
cat >/etc/etcd/etcd.conf<<EOF
#[Member]
ETCD_DATA_DIR="/var/lib/etcd/default.etcd"
ETCD_LISTEN_PEER_URLS="http://$controller_public_ip:2380"
ETCD_LISTEN_CLIENT_URLS="http://$controller_public_ip:2379"
ETCD_NAME="controller"
#[Clustering]
ETCD_INITIAL_ADVERTISE_PEER_URLS="http://$controller_public_ip:2380"
ETCD_ADVERTISE_CLIENT_URLS="http://$controller_public_ip:2379"
ETCD_INITIAL_CLUSTER="controller=http://$controller_public_ip:2380"
ETCD_INITIAL_CLUSTER_TOKEN="etcd-cluster-01"
ETCD_INITIAL_CLUSTER_STATE="new"
EOF
systemctl enable --now etcd
yum -y install python-openstackclient
#数据库的密码可以设置成变量
mysql -uroot -e 'CREATE DATABASE keystone default character set utf8;'
mysql -uroot -e "GRANT ALL PRIVILEGES ON keystone.* TO 'keystone'@'localhost' IDENTIFIED BY '$mysql_user_pw';"
mysql -uroot -e "GRANT ALL PRIVILEGES ON keystone.* TO 'keystone'@'%' IDENTIFIED BY '$mysql_user_pw';"
yum -y --enablerepo=centos-openstack-train install qpid-proton-c-0.26.0-2.el7.x86_64
yum -y install openstack-keystone httpd mod_wsgi
cd /etc/keystone/ && mv keystone.conf keystone.conf.source && cat keystone.conf.source |grep -Ev "^#|^$" > keystone.conf && chown root:keystone keystone.conf
yum install -y openstack-utils
#此处的密码可以设置成变量
openstack-config --set  /etc/keystone/keystone.conf database connection mysql+pymysql://keystone:${mysql_user_pw}@controller/keystone
openstack-config --set  /etc/keystone/keystone.conf token expiration 86400
openstack-config --set  /etc/keystone/keystone.conf token provider fernet
su -s /bin/sh -c "keystone-manage db_sync" keystone
keystone-manage fernet_setup --keystone-user keystone --keystone-group keystone
keystone-manage credential_setup --keystone-user keystone --keystone-group keystone
#此处的密码是登录dashboard的密码,可以设置成www.123.nyc
keystone-manage bootstrap --bootstrap-password www.123.nyc \
--bootstrap-admin-url http://controller:5000/v3/ \
--bootstrap-internal-url http://controller:5000/v3/ \
--bootstrap-public-url http://controller:5000/v3/ \
--bootstrap-region-id RegionOne
yum install -y httpd
#此处的IP或域名可以设置成变量
sed -i "/#ServerName www.example.com:80/a ServerName $controller_public_ip:80" /etc/httpd/conf/httpd.conf
ln -s /usr/share/keystone/wsgi-keystone.conf /etc/httpd/conf.d/
systemctl enable httpd.service
systemctl restart httpd.service
#此处的密码可以设置成变量
cat > /root/admin-openrc.sh <<EOF
export OS_USERNAME=admin
export OS_PASSWORD=www.123.nyc
export OS_PROJECT_NAME=admin
export OS_USER_DOMAIN_NAME=Default
export OS_PROJECT_DOMAIN_NAME=Default
export OS_AUTH_URL=http://controller:5000/v3
export OS_IDENTITY_API_VERSION=3
export OS_IMAGE_API_VERSION=2
EOF
cd ~
source admin-openrc.sh
openstack project create --domain default --description "Service Project" service
openstack role create user
#此处密码可以设置成变量
mysql -uroot -e "CREATE DATABASE placement default character set utf8;"
mysql -uroot -e "GRANT ALL PRIVILEGES ON placement.* TO 'placement'@'localhost' IDENTIFIED BY '$mysql_user_pw';"
mysql -uroot -e "GRANT ALL PRIVILEGES ON placement.* TO 'placement'@'%' IDENTIFIED BY '$mysql_user_pw';"
#此处密码可以设置成变量
openstack user create --domain default --password $openstack_user_pw placement
openstack role add --project service --user placement admin
openstack service create --name placement --description "Placement API" placement
openstack endpoint create --region RegionOne placement public http://controller:8778
openstack endpoint create --region RegionOne placement internal http://controller:8778
openstack endpoint create --region RegionOne placement admin http://controller:8778
yum -y install openstack-placement-api
cd /etc/placement/ && mv placement.conf placement.conf.source && cat placement.conf.source |grep -Ev "^#|^$" > placement.conf && chown root:placement placement.conf
#此处密码可以设置成变量
openstack-config --set /etc/placement/placement.conf placement_database connection mysql+pymysql://placement:${mysql_user_pw}@controller/placement
openstack-config --set /etc/placement/placement.conf api auth_strategy keystone
openstack-config --set /etc/placement/placement.conf keystone_authtoken auth_url http://controller:5000/v3
openstack-config --set /etc/placement/placement.conf keystone_authtoken memcached_servers controller:11211
openstack-config --set /etc/placement/placement.conf keystone_authtoken auth_type password
openstack-config --set /etc/placement/placement.conf keystone_authtoken project_domain_name default
openstack-config --set /etc/placement/placement.conf keystone_authtoken user_domain_name default
openstack-config --set /etc/placement/placement.conf keystone_authtoken project_name service
openstack-config --set /etc/placement/placement.conf keystone_authtoken username placement
#此处密码可以设置成变量
openstack-config --set /etc/placement/placement.conf keystone_authtoken password $openstack_user_pw
cp /etc/httpd/conf.d/00-placement-api.conf{,.bak}
sed -i '/ErrorLog \/var\/log\/placement\/placement-api.log/a \  <Directory /usr/bin>\n  <IfVersion >= 2.4>\n  Require all granted\n  </IfVersion>\n  <IfVersion < 2.4>\n  Order allow,deny\n  Allow from all\n  </IfVersion>\n  </Directory>' /etc/httpd/conf.d/00-placement-api.conf
su -s /bin/sh -c "placement-manage db sync" placement
systemctl restart httpd
yum install -y python-pip
cat > /etc/pip.conf <<EOF
[global]
index-url = https://pypi.douban.com/simple/
[install]
trusted-host = https://pypi.douban.com
EOF
pip install osc-placement==2.2.0
#此处密码可以设置成变量
mysql -uroot -e "CREATE DATABASE glance default character set utf8;"
mysql -uroot -e "GRANT ALL PRIVILEGES ON glance.* TO 'glance'@'localhost' IDENTIFIED BY '$mysql_user_pw';"
mysql -uroot -e "GRANT ALL PRIVILEGES ON glance.* TO 'glance'@'%' IDENTIFIED BY '$mysql_user_pw';"
#此处密码可以设置成变量
openstack user create --domain default --password $openstack_user_pw glance
openstack role add --project service --user glance admin
openstack service create --name glance --description "OpenStack Image" image
openstack endpoint create --region RegionOne image public http://controller:9292
openstack endpoint create --region RegionOne image internal http://controller:9292
openstack endpoint create --region RegionOne image admin http://controller:9292
yum -y install openstack-glance
cd /etc/glance/ && mv glance-api.conf glance-api.conf.source && cat glance-api.conf.source |grep -Ev "^#|^$" > glance-api.conf && chown root:glance glance-api.conf
openstack-config --set /etc/glance/glance-api.conf DEFAULT show_image_direct_url True
#此处密码可以设置成变量
openstack-config --set /etc/glance/glance-api.conf DEFAULT transport_url rabbit://openstack:${rabbitmq_user_pw}@controller
#此处密码可以设置成变量
openstack-config --set /etc/glance/glance-api.conf database connection mysql+pymysql://glance:${mysql_user_pw}@controller/glance
openstack-config --set /etc/glance/glance-api.conf keystone_authtoken www_authenticate_uri http://controller:5000
openstack-config --set /etc/glance/glance-api.conf keystone_authtoken auth_url http://controller:5000
openstack-config --set /etc/glance/glance-api.conf keystone_authtoken memcached_servers controller:11211
openstack-config --set /etc/glance/glance-api.conf keystone_authtoken auth_type password
openstack-config --set /etc/glance/glance-api.conf keystone_authtoken project_domain_name Default
openstack-config --set /etc/glance/glance-api.conf keystone_authtoken user_domain_name Default
openstack-config --set /etc/glance/glance-api.conf keystone_authtoken project_name service
openstack-config --set /etc/glance/glance-api.conf keystone_authtoken username glance
#此处密码可以设置成变量
openstack-config --set /etc/glance/glance-api.conf keystone_authtoken password $openstack_user_pw
openstack-config --set /etc/glance/glance-api.conf paste_deploy flavor keystone
openstack-config --set /etc/glance/glance-api.conf glance_store stores file,http
openstack-config --set /etc/glance/glance-api.conf glance_store default_store file
openstack-config --set /etc/glance/glance-api.conf glance_store filesystem_store_datadir /var/lib/glance/images/
cd /etc/glance/ && mv glance-registry.conf glance-registry.conf.source && cat glance-registry.conf.source |grep -Ev "^#|^$" > glance-registry.conf&& chown root:glance glance-registry.conf
#此处密码可以设置成变量
openstack-config --set /etc/glance/glance-registry.conf database connection mysql+pymysql://glance:${mysql_user_pw}@controller/glance
openstack-config --set /etc/glance/glance-registry.conf keystone_authtoken www_authenticate_uri http://controller:5000
openstack-config --set /etc/glance/glance-registry.conf keystone_authtoken auth_url http://controller:5000
openstack-config --set /etc/glance/glance-registry.conf keystone_authtoken memcached_servers controller:11211
openstack-config --set /etc/glance/glance-registry.conf keystone_authtoken auth_type password
openstack-config --set /etc/glance/glance-registry.conf keystone_authtoken project_domain_name Default
openstack-config --set /etc/glance/glance-registry.conf keystone_authtoken user_domain_name Default
openstack-config --set /etc/glance/glance-registry.conf keystone_authtoken project_name service
openstack-config --set /etc/glance/glance-registry.conf keystone_authtoken username glance
#此处密码可以设置成变量
openstack-config --set /etc/glance/glance-registry.conf keystone_authtoken password $openstack_user_pw
openstack-config --set /etc/glance/glance-registry.conf paste_deploy flavor keystone
su -s /bin/sh -c "glance-manage db_sync" glance
systemctl enable --now openstack-glance-api.service openstack-glance-registry.service
systemctl status openstack-glance-api.service openstack-glance-registry.service
cd ~
wget --http-user=qwe --http-passwd=qwe http://61.160.213.184/dl/centos/openstack/cirros-0.4.0-x86_64-disk.img
openstack image create "cirros-0.4.0-x86_64" --file cirros-0.4.0-x86_64-disk.img --disk-format qcow2 --container-format bare --public
mysql -uroot -e "CREATE DATABASE neutron default character set utf8;"
mysql -uroot -e "GRANT ALL PRIVILEGES ON neutron.* TO 'neutron'@'localhost' IDENTIFIED BY '$mysql_user_pw';"
mysql -uroot -e "GRANT ALL PRIVILEGES ON neutron.* TO 'neutron'@'%' IDENTIFIED BY '$mysql_user_pw';"
#此处密码可以设置成变量
openstack user create --domain default --password $openstack_user_pw neutron
openstack role add --project service --user neutron admin
openstack service create --name neutron --description "OpenStack Networking" network
openstack endpoint create --region RegionOne network public http://controller:9696
openstack endpoint create --region RegionOne network internal http://controller:9696
openstack endpoint create --region RegionOne network admin http://controller:9696
yum -y install openstack-neutron openstack-neutron-ml2 openstack-neutron-linuxbridge ebtables
cd /etc/neutron/ && mv neutron.conf neutron.conf.source && cat neutron.conf.source |grep -Ev "^#|^$" > neutron.conf && chown root:neutron neutron.conf
openstack-config --set /etc/neutron/neutron.conf DEFAULT core_plugin ml2
openstack-config --set /etc/neutron/neutron.conf DEFAULT service_plugins router
#此处密码可以设置成变量
openstack-config --set /etc/neutron/neutron.conf DEFAULT transport_url rabbit://openstack:${rabbitmq_user_pw}@controller
openstack-config --set /etc/neutron/neutron.conf DEFAULT auth_strategy keystone
openstack-config --set /etc/neutron/neutron.conf DEFAULT notify_nova_on_port_status_changes true
openstack-config --set /etc/neutron/neutron.conf DEFAULT notify_nova_on_port_data_changes true
openstack-config --set /etc/neutron/neutron.conf DEFAULT allow_overlapping_ips true
#此处密码可以设置成变量
openstack-config --set /etc/neutron/neutron.conf database connection mysql+pymysql://neutron:${mysql_user_pw}@controller/neutron
openstack-config --set /etc/neutron/neutron.conf keystone_authtoken www_authenticate_uri http://controller:5000
openstack-config --set /etc/neutron/neutron.conf keystone_authtoken auth_url http://controller:5000
openstack-config --set /etc/neutron/neutron.conf keystone_authtoken memcached_servers controller:11211
openstack-config --set /etc/neutron/neutron.conf keystone_authtoken auth_type password
openstack-config --set /etc/neutron/neutron.conf keystone_authtoken project_domain_name default
openstack-config --set /etc/neutron/neutron.conf keystone_authtoken user_domain_name default
openstack-config --set /etc/neutron/neutron.conf keystone_authtoken project_name service
openstack-config --set /etc/neutron/neutron.conf keystone_authtoken username neutron
#此处密码可以设置成变量
openstack-config --set /etc/neutron/neutron.conf keystone_authtoken password $openstack_user_pw
openstack-config --set /etc/neutron/neutron.conf keystone_authtoken token_cache_time 3600
openstack-config --set /etc/neutron/neutron.conf oslo_concurrency lock_path /var/lib/neutron/tmp
#此处密码可以设置成变量
cat >>/etc/neutron/neutron.conf<<EOF
[nova]
auth_url = http://controller:5000
auth_type = password
project_domain_name = default
user_domain_name = default
region_name = RegionOne
project_name = service
username = nova
password = $openstack_user_pw
EOF
cd /etc/neutron/plugins/ml2 && mv ml2_conf.ini ml2_conf.ini.source && cat ml2_conf.ini.source |grep -Ev "^#|^$" > ml2_conf.ini && chown root:neutron ml2_conf.ini
openstack-config --set /etc/neutron/plugins/ml2/ml2_conf.ini ml2 type_drivers flat,vlan,vxlan
openstack-config --set /etc/neutron/plugins/ml2/ml2_conf.ini ml2 tenant_network_types vxlan
openstack-config --set /etc/neutron/plugins/ml2/ml2_conf.ini ml2 mechanism_drivers linuxbridge,l2population
openstack-config --set /etc/neutron/plugins/ml2/ml2_conf.ini ml2 extension_drivers port_security
openstack-config --set /etc/neutron/plugins/ml2/ml2_conf.ini ml2_type_flat flat_networks provider
openstack-config --set /etc/neutron/plugins/ml2/ml2_conf.ini ml2_type_vlan network_vlan_ranges provider
openstack-config --set /etc/neutron/plugins/ml2/ml2_conf.ini ml2_type_vxlan vni_ranges 1:3000
openstack-config --set /etc/neutron/plugins/ml2/ml2_conf.ini securitygroup enable_ipset true
cd /etc/neutron/plugins/ml2 && mv linuxbridge_agent.ini linuxbridge_agent.ini.source && cat linuxbridge_agent.ini.source |grep -Ev "^#|^$" >linuxbridge_agent.ini && chown root:neutron linuxbridge_agent.ini
#此处的网卡名可以设置变量
openstack-config --set /etc/neutron/plugins/ml2/linuxbridge_agent.ini linux_bridge physical_interface_mappings provider:$controller_public_name
openstack-config --set /etc/neutron/plugins/ml2/linuxbridge_agent.ini vxlan enable_vxlan true
#此处要配置内网IP地址,可以设置成变量(给 vxlan 专用,并且要配置 IP 地址(不需要配置网关,配置 IP 后,各节点可以使用对应 IP ping 通))
openstack-config --set /etc/neutron/plugins/ml2/linuxbridge_agent.ini vxlan  local_ip $controller_provide_ip
openstack-config --set /etc/neutron/plugins/ml2/linuxbridge_agent.ini vxlan  l2_population true
openstack-config --set /etc/neutron/plugins/ml2/linuxbridge_agent.ini securitygroup enable_security_group true
openstack-config --set /etc/neutron/plugins/ml2/linuxbridge_agent.ini securitygroup firewall_driver neutron.agent.linux.iptables_firewall.IptablesFirewallDriver
cat >>/etc/sysctl.conf<<EOF
net.bridge.bridge-nf-call-iptables = 1
net.bridge.bridge-nf-call-ip6tables = 1
EOF
modprobe br_netfilter
sysctl -p
sed -i '$amodprobe br_netfilter' /etc/rc.local
chmod +x /etc/rc.d/rc.local
cd /etc/neutron/ && mv dhcp_agent.ini dhcp_agent.ini.source && cat dhcp_agent.ini.source |grep -Ev "^#|^$" > dhcp_agent.ini && chown root:neutron dhcp_agent.ini
openstack-config --set /etc/neutron//dhcp_agent.ini DEFAULT interface_driver linuxbridge
openstack-config --set /etc/neutron//dhcp_agent.ini DEFAULT dhcp_driver neutron.agent.linux.dhcp.Dnsmasq
openstack-config --set /etc/neutron//dhcp_agent.ini DEFAULT enable_isolated_metadata true
cd /etc/neutron/ && mv metadata_agent.ini metadata_agent.ini.source && cat metadata_agent.ini.source |grep -Ev "^#|^$" > metadata_agent.ini&& chown root:neutron metadata_agent.ini
openstack-config --set /etc/neutron/metadata_agent.ini DEFAULT nova_metadata_host controller
#此处密码可以设置成变量,要与下面的metadata_proxy_shared_secret密码保持一致
openstack-config --set /etc/neutron/metadata_agent.ini DEFAULT metadata_proxy_shared_secret openstack2023
cd /etc/neutron/ && mv l3_agent.ini l3_agent.ini.source && cat l3_agent.ini.source |grep -Ev "^#|^$" > l3_agent.ini && chown root:neutron l3_agent.ini
openstack-config --set /etc/neutron/l3_agent.ini DEFAULT interface_driver linuxbridge
openstack-config --set /etc/neutron/l3_agent.ini DEFAULT external_network_bridge
yum -y install openstack-nova-api openstack-nova-conductor openstack-nova-novncproxy openstack-nova-scheduler
cd /etc/nova/ && mv nova.conf nova.conf.source && cat nova.conf.source |grep -Ev "^#|^$" > nova.conf && chown root:nova nova.conf
openstack-config --set /etc/nova/nova.conf neutron url http://controller:9696
openstack-config --set /etc/nova/nova.conf neutron auth_url http://controller:5000
openstack-config --set /etc/nova/nova.conf neutron auth_type password
openstack-config --set /etc/nova/nova.conf neutron project_domain_name default
openstack-config --set /etc/nova/nova.conf neutron user_domain_name default
openstack-config --set /etc/nova/nova.conf neutron region_name RegionOne
openstack-config --set /etc/nova/nova.conf neutron project_name service
openstack-config --set /etc/nova/nova.conf neutron username neutron
#此处密码可以设置成变量
openstack-config --set /etc/nova/nova.conf neutron password $openstack_user_pw
openstack-config --set /etc/nova/nova.conf neutron service_metadata_proxy true
#此处密码可以设置成变量,要与上面的metadata_proxy_shared_secret密码保持一致
openstack-config --set /etc/nova/nova.conf neutron metadata_proxy_shared_secret openstack2023
ln -s /etc/neutron/plugins/ml2/ml2_conf.ini /etc/neutron/plugin.ini
su -s /bin/sh -c "neutron-db-manage --config-file /etc/neutron/neutron.conf --config-file /etc/neutron/plugins/ml2/ml2_conf.ini upgrade head" neutron
systemctl enable neutron-server.service neutron-linuxbridge-agent.service neutron-dhcp-agent.service neutron-metadata-agent.service neutron-l3-agent.service
systemctl restart neutron-server.service neutron-linuxbridge-agent.service neutron-dhcp-agent.service neutron-metadata-agent.service neutron-l3-agent.service
systemctl status neutron-server.service neutron-linuxbridge-agent.service neutron-dhcp-agent.service neutron-metadata-agent.service neutron-l3-agent.service
#此处密码可以设置成变量
mysql -uroot -e "CREATE DATABASE nova_api default character set utf8;"
mysql -uroot -e "CREATE DATABASE nova default character set utf8;"
mysql -uroot -e "CREATE DATABASE nova_cell0 default character set utf8;"
mysql -uroot -e "GRANT ALL PRIVILEGES ON nova_api.* TO 'nova'@'localhost' IDENTIFIED BY '$mysql_user_pw';"
mysql -uroot -e "GRANT ALL PRIVILEGES ON nova_api.* TO 'nova'@'%' IDENTIFIED BY '$mysql_user_pw';"
mysql -uroot -e "GRANT ALL PRIVILEGES ON nova.* TO 'nova'@'localhost' IDENTIFIED BY '$mysql_user_pw';"
mysql -uroot -e "GRANT ALL PRIVILEGES ON nova.* TO 'nova'@'%' IDENTIFIED BY '$mysql_user_pw';"
mysql -uroot -e "GRANT ALL PRIVILEGES ON nova_cell0.* TO 'nova'@'localhost' IDENTIFIED BY '$mysql_user_pw';"
mysql -uroot -e "GRANT ALL PRIVILEGES ON nova_cell0.* TO 'nova'@'%' IDENTIFIED BY '$mysql_user_pw';"
#此处密码可以设置成变量
openstack user create --domain default --password $openstack_user_pw nova
openstack role add --project service --user nova admin
openstack service create --name nova --description "OpenStack Compute" compute
openstack endpoint create --region RegionOne compute public http://controller:8774/v2.1
openstack endpoint create --region RegionOne compute internal http://controller:8774/v2.1
openstack endpoint create --region RegionOne compute admin http://controller:8774/v2.1
cp /etc/nova/nova.conf{,.bak}
openstack-config --set /etc/nova/nova.conf DEFAULT enabled_apis osapi_compute,metadata
#此处密码可以设置成变量
openstack-config --set /etc/nova/nova.conf DEFAULT transport_url rabbit://openstack:${rabbitmq_user_pw}@controller
#此处的IP为控制节点的公网IP,可以设置成变量
openstack-config --set /etc/nova/nova.conf DEFAULT my_ip $controller_public_ip
openstack-config --set /etc/nova/nova.conf DEFAULT use_neutron true
openstack-config --set /etc/nova/nova.conf DEFAULT firewall_driver nova.virt.firewall.NoopFirewallDriver
openstack-config --set /etc/nova/nova.conf DEFAULT allow_resize_to_same_host true
#此处密码可以设置成变量
openstack-config --set /etc/nova/nova.conf api_database connection mysql+pymysql://nova:${mysql_user_pw}@controller/nova_api
#此处密码可以设置成变量
openstack-config --set /etc/nova/nova.conf database connection mysql+pymysql://nova:${mysql_user_pw}@controller/nova
openstack-config --set /etc/nova/nova.conf api auth_strategy keystone
openstack-config --set /etc/nova/nova.conf api token_cache_time 3600
openstack-config --set /etc/nova/nova.conf keystone_authtoken auth_url http://controller:5000/v3
openstack-config --set /etc/nova/nova.conf keystone_authtoken memcached_servers controller:11211
openstack-config --set /etc/nova/nova.conf keystone_authtoken auth_type password
openstack-config --set /etc/nova/nova.conf keystone_authtoken project_domain_name Default
openstack-config --set /etc/nova/nova.conf keystone_authtoken user_domain_name Default
openstack-config --set /etc/nova/nova.conf keystone_authtoken project_name service
openstack-config --set /etc/nova/nova.conf keystone_authtoken username nova
#此处密码可以设置成变量
openstack-config --set /etc/nova/nova.conf keystone_authtoken password $openstack_user_pw
openstack-config --set /etc/nova/nova.conf keystone_authtoken token_cache_time 3600
openstack-config --set /etc/nova/nova.conf vnc enabled true
openstack-config --set /etc/nova/nova.conf vnc server_listen \$my_ip
openstack-config --set /etc/nova/nova.conf vnc server_proxyclient_address \$my_ip
openstack-config --set /etc/nova/nova.conf vnc novncproxy_host 0.0.0.0
openstack-config --set /etc/nova/nova.conf vnc novncproxy_port 6080
#此处的IP为控制节点的公网IP或者域名,可以设置成变量
openstack-config --set /etc/nova/nova.conf vnc novncproxy_base_url http://$controller_public_ip:6080/vnc_auto.html
openstack-config --set /etc/nova/nova.conf glance api_servers http://controller:9292
openstack-config --set /etc/nova/nova.conf oslo_concurrency lock_path /var/lib/nova/tmp
openstack-config --set /etc/nova/nova.conf placement region_name RegionOne
openstack-config --set /etc/nova/nova.conf placement project_domain_name Default
openstack-config --set /etc/nova/nova.conf placement project_name service
openstack-config --set /etc/nova/nova.conf placement auth_type password
openstack-config --set /etc/nova/nova.conf placement user_domain_name Default
openstack-config --set /etc/nova/nova.conf placement auth_url http://controller:5000/v3
openstack-config --set /etc/nova/nova.conf placement username placement
#此处密码可以设置成变量
openstack-config --set /etc/nova/nova.conf placement password $openstack_user_pw
openstack-config --set /etc/nova/nova.conf scheduler discover_hosts_in_cells_interval 180
su -s /bin/sh -c "nova-manage api_db sync" nova
su -s /bin/sh -c "nova-manage cell_v2 map_cell0" nova
su -s /bin/sh -c "nova-manage cell_v2 create_cell --name=cell1 --verbose" nova
su -s /bin/sh -c "nova-manage db sync" nova
systemctl enable openstack-nova-api.service openstack-nova-scheduler.service openstack-nova-conductor.service openstack-nova-novncproxy.service
systemctl restart openstack-nova-api.service openstack-nova-scheduler.service openstack-nova-conductor.service openstack-nova-novncproxy.service
systemctl status openstack-nova-api.service openstack-nova-scheduler.service openstack-nova-conductor.service openstack-nova-novncproxy.service
yum -y install openstack-dashboard
\cp /etc/openstack-dashboard/local_settings{,.bak}
egrep -v '^$|#' /etc/openstack-dashboard/local_settings.bak >/etc/openstack-dashboard/local_settings
sed -i '/OPENSTACK_HOST =/c  OPENSTACK_HOST = "controller"' /etc/openstack-dashboard/local_settings
sed -i "/ALLOWED_HOSTS =/c  ALLOWED_HOSTS = ['*', ]" /etc/openstack-dashboard/local_settings
sed -i '/OPENSTACK_KEYSTONE_URL/a OPENSTACK_KEYSTONE_MULTIDOMAIN_SUPPORT = True' /etc/openstack-dashboard/local_settings
sed -i "/ALLOWED_HOSTS =/a  SESSION_ENGINE = 'django.contrib.sessions.backends.cache'" /etc/openstack-dashboard/local_settings
#sed -i "/ALLOWED_HOSTS =/a  SESSION_ENGINE = 'django.contrib.sessions.backends.file'" /etc/openstack-dashboard/local_settings
sed -i "/'enable_ipv6': True/c \ \ \ \ 'enable_ipv6': False," /etc/openstack-dashboard/local_settings
sed -i '/TIME_ZONE =/c TIME_ZONE = "Asia/Shanghai"' /etc/openstack-dashboard/local_settings
cat >>/etc/openstack-dashboard/local_settings<<'EOF'
CACHES = {
    'default': {
         'BACKEND': 'django.core.cache.backends.memcached.MemcachedCache',
         'LOCATION': 'controller:11211',
    }
}

OPENSTACK_API_VERSIONS = {
    "identity": 3,
    "image": 2,
    "volume": 2,
}

OPENSTACK_KEYSTONE_DEFAULT_DOMAIN = "Default"
OPENSTACK_KEYSTONE_DEFAULT_ROLE = "user"
WEBROOT = '/dashboard/'
SESSION_TIMEOUT = 86400

OPENSTACK_CINDER_FEATURES = {
'enable_backup': True,
}
EOF
\cp /etc/httpd/conf.d/openstack-dashboard.conf{,.bak}
sed -ri '4i WSGIApplicationGroup %{GLOBAL}' /etc/httpd/conf.d/openstack-dashboard.conf
chown -R apache:apache /usr/share/openstack-dashboard/
systemctl restart httpd.service memcached.service

######################################控制节点部署cinder###################################
mysql -uroot -e "CREATE DATABASE cinder default character set utf8;"
mysql -uroot -e "GRANT ALL PRIVILEGES ON cinder.* TO 'cinder'@'localhost' IDENTIFIED BY '$mysql_user_pw';"
mysql -uroot -e "GRANT ALL PRIVILEGES ON cinder.* TO 'cinder'@'%' IDENTIFIED BY '$mysql_user_pw';"
cd ~
source admin-openrc.sh
openstack user create --domain default --password $openstack_user_pw cinder
openstack role add --project service --user cinder admin
openstack service create --name cinderv2 --description "OpenStack Block Storage" volumev2
openstack service create --name cinderv3 --description "OpenStack Block Storage" volumev3
openstack endpoint create --region RegionOne volumev2 public http://controller:8776/v2/%\(project_id\)s
openstack endpoint create --region RegionOne volumev2 internal http://controller:8776/v2/%\(project_id\)s
openstack endpoint create --region RegionOne volumev2 admin http://controller:8776/v2/%\(project_id\)s
openstack endpoint create --region RegionOne volumev3 public http://controller:8776/v3/%\(project_id\)s
openstack endpoint create --region RegionOne volumev3 internal http://controller:8776/v3/%\(project_id\)s
openstack endpoint create --region RegionOne volumev3 admin http://controller:8776/v3/%\(project_id\)s
yum -y install openstack-cinder
cd /etc/cinder/ && mv cinder.conf cinder.conf.source && cat cinder.conf.source |grep -Ev "^#|^$" > cinder.conf && chown cinder:root cinder.conf
openstack-config --set /etc/cinder/cinder.conf DEFAULT transport_url rabbit://openstack:${rabbitmq_user_pw}@controller
openstack-config --set /etc/cinder/cinder.conf DEFAULT auth_strategy keystone
openstack-config --set /etc/cinder/cinder.conf DEFAULT my_ip $controller_public_ip
#修改默认的卷类型(原名:__DEFAULT__),记得修改cinder数据库volume_types
#openstack-config --set /etc/cinder/cinder.conf DEFAULT default_volume_type hdd
openstack-config --set /etc/cinder/cinder.conf database connection mysql+pymysql://cinder:${mysql_user_pw}@controller/cinder
openstack-config --set /etc/cinder/cinder.conf keystone_authtoken www_authenticate_uri http://controller:5000
openstack-config --set /etc/cinder/cinder.conf keystone_authtoken auth_url http://controller:5000/v3
openstack-config --set /etc/cinder/cinder.conf keystone_authtoken memcached_servers controller:11211
openstack-config --set /etc/cinder/cinder.conf keystone_authtoken auth_type password
openstack-config --set /etc/cinder/cinder.conf keystone_authtoken project_domain_name default
openstack-config --set /etc/cinder/cinder.conf keystone_authtoken user_domain_name default
openstack-config --set /etc/cinder/cinder.conf keystone_authtoken project_name service
openstack-config --set /etc/cinder/cinder.conf keystone_authtoken username cinder
openstack-config --set /etc/cinder/cinder.conf keystone_authtoken password $openstack_user_pw
openstack-config --set /etc/cinder/cinder.conf oslo_concurrency lock_path /var/lib/cinder/tmp
openstack-config --set /etc/cinder/cinder.conf cinder os_region_name RegionOne
su -s /bin/sh -c "cinder-manage db sync" cinder
systemctl restart openstack-nova-api.service
systemctl enable openstack-cinder-api.service openstack-cinder-scheduler.service
systemctl restart openstack-cinder-api.service openstack-cinder-scheduler.service
systemctl status openstack-cinder-api.service openstack-cinder-scheduler.service
计算节点执行命令:
#################################################################################
#创建rabbitmq用户openstack的密码
rabbitmq_user_pw=9b01ab2815be2db0f8cc
#openstack组件用户密码
openstack_user_pw=96ab95518e97bebc8c27
#计算节点公网网卡名
compute_public_name=ens33
#计算节点的公网IP
compute_public_ip=192.168.59.41
#计算节点的内网IP
compute_provide_ip=10.168.59.41
#控制节点的公网IP
controller_public_ip=192.168.59.40
#openstack组件用户密码
openstack_user_pw=96ab95518e97bebc8c27
#################################################################################
#在计算节点(compute01、compute02)安装 Neutron 服务,同时配置支持 vxlan(由于 neutron 和 nova 之间有相互调用配置,此处将计算服务一并安装)
yum --enablerepo=centos-openstack-train install -y qpid-proton-c-0.26.0-2.el7.x86_64
yum -y install openstack-nova-compute
yum -y install openstack-neutron-linuxbridge ebtables ipset
yum install -y openstack-utils
cd /etc/neutron/ && mv neutron.conf neutron.conf.source && cat neutron.conf.source |grep -Ev "^#|^$" > neutron.conf && chown root:neutron neutron.conf
#此处的密码可以设置成变量
openstack-config --set /etc/neutron/neutron.conf DEFAULT transport_url rabbit://openstack:${rabbitmq_user_pw}@controller
openstack-config --set /etc/neutron/neutron.conf DEFAULT auth_strategy keystone
openstack-config --set /etc/neutron/neutron.conf keystone_authtoken www_authenticate_uri http://controller:5000
openstack-config --set /etc/neutron/neutron.conf keystone_authtoken auth_url http://controller:5000
openstack-config --set /etc/neutron/neutron.conf keystone_authtoken memcached_servers controller:11211
openstack-config --set /etc/neutron/neutron.conf keystone_authtoken auth_type password
openstack-config --set /etc/neutron/neutron.conf keystone_authtoken project_domain_name default
openstack-config --set /etc/neutron/neutron.conf keystone_authtoken user_domain_name default
openstack-config --set /etc/neutron/neutron.conf keystone_authtoken project_name service
openstack-config --set /etc/neutron/neutron.conf keystone_authtoken username neutron
#此处的密码可以设置成变量
openstack-config --set /etc/neutron/neutron.conf keystone_authtoken password $openstack_user_pw
openstack-config --set /etc/neutron/neutron.conf keystone_authtoken token_cache_time 3600
openstack-config --set /etc/neutron/neutron.conf oslo_concurrency lock_path /var/lib/neutron/tmp
cd /etc/neutron/plugins/ml2 && mv linuxbridge_agent.ini linuxbridge_agent.ini.source && cat linuxbridge_agent.ini.source |grep -Ev "^#|^$" >linuxbridge_agent.ini && chown root:neutron linuxbridge_agent.ini
#此处的网卡名可以设置成变量
openstack-config --set /etc/neutron/plugins/ml2/linuxbridge_agent.ini linux_bridge physical_interface_mappings provider:$compute_public_name
openstack-config --set /etc/neutron/plugins/ml2/linuxbridge_agent.ini vxlan enable_vxlan true
#此处的内网IP可以设置成变量
openstack-config --set /etc/neutron/plugins/ml2/linuxbridge_agent.ini vxlan local_ip $compute_provide_ip
openstack-config --set /etc/neutron/plugins/ml2/linuxbridge_agent.ini vxlan l2_population true
openstack-config --set /etc/neutron/plugins/ml2/linuxbridge_agent.ini securitygroup firewall_driver neutron.agent.linux.iptables_firewall.IptablesFirewallDriver
openstack-config --set /etc/neutron/plugins/ml2/linuxbridge_agent.ini securitygroup enable_security_group True
cat >>/etc/sysctl.conf<<EOF
net.bridge.bridge-nf-call-iptables = 1
net.bridge.bridge-nf-call-ip6tables = 1
EOF
modprobe br_netfilter
sysctl -p
sed -i '$amodprobe br_netfilter' /etc/rc.local
chmod +x /etc/rc.d/rc.local
systemctl enable neutron-linuxbridge-agent.service
systemctl restart neutron-linuxbridge-agent.service
##############################################################################
#在计算节点(compute01、compute02)安装配置nova
yum -y install openstack-nova-compute
cd /etc/nova/ && mv nova.conf nova.conf.source && cat nova.conf.source |grep -Ev "^#|^$" > nova.conf && chown nova:root nova.conf
openstack-config --set /etc/nova/nova.conf DEFAULT enabled_apis osapi_compute,metadata
#此处密码可以设置成变量
openstack-config --set /etc/nova/nova.conf DEFAULT transport_url rabbit://openstack:${rabbitmq_user_pw}@controller
#此处是计算节点的公网IP地址可以设置成变量
openstack-config --set /etc/nova/nova.conf DEFAULT my_ip $compute_public_ip
openstack-config --set /etc/nova/nova.conf DEFAULT use_neutron true
openstack-config --set /etc/nova/nova.conf DEFAULT firewall_driver nova.virt.firewall.NoopFirewallDriver
#计算节点重启了,虚拟机也跟随重启
openstack-config --set /etc/nova/nova.conf DEFAULT resume_guests_state_on_host_boot true
#解决实例迁移和升降配的问题
openstack-config --set /etc/nova/nova.conf DEFAULT allow_resize_to_same_host true
openstack-config --set /etc/nova/nova.conf DEFAULT allow_migrate_to_same_host true
openstack-config --set /etc/nova/nova.conf DEFAULT resize_confirm_window 1
openstack-config --set /etc/nova/nova.conf api auth_strategy keystone
openstack-config --set /etc/nova/nova.conf keystone_authtoken auth_url http://controller:5000/v3
openstack-config --set /etc/nova/nova.conf keystone_authtoken memcached_servers controller:11211
openstack-config --set /etc/nova/nova.conf keystone_authtoken auth_type password
openstack-config --set /etc/nova/nova.conf keystone_authtoken project_domain_name Default
openstack-config --set /etc/nova/nova.conf keystone_authtoken user_domain_name Default
openstack-config --set /etc/nova/nova.conf keystone_authtoken project_name service
openstack-config --set /etc/nova/nova.conf keystone_authtoken username nova
#此处密码可以设置成变量
openstack-config --set /etc/nova/nova.conf keystone_authtoken password $openstack_user_pw
openstack-config --set /etc/nova/nova.conf keystone_authtoken token_cache_time 3600
openstack-config --set /etc/nova/nova.conf neutron url http://controller:9696
openstack-config --set /etc/nova/nova.conf neutron auth_url http://controller:5000/v3
openstack-config --set /etc/nova/nova.conf neutron auth_type password
openstack-config --set /etc/nova/nova.conf neutron project_domain_name default
openstack-config --set /etc/nova/nova.conf neutron user_domain_name default
openstack-config --set /etc/nova/nova.conf neutron region_name RegionOne
openstack-config --set /etc/nova/nova.conf neutron project_name service
openstack-config --set /etc/nova/nova.conf neutron username neutron
#此处密码可以设置成变量
openstack-config --set /etc/nova/nova.conf neutron password $openstack_user_pw
openstack-config --set /etc/nova/nova.conf vnc enabled true
openstack-config --set /etc/nova/nova.conf vnc server_listen 0.0.0.0
openstack-config --set /etc/nova/nova.conf vnc server_proxyclient_address \$my_ip
#此处是控制节点的公网IP或域名可以设置成变量
openstack-config --set /etc/nova/nova.conf vnc novncproxy_base_url http://$controller_public_ip:6080/vnc_auto.html
openstack-config --set /etc/nova/nova.conf vnc vncserver_proxyclient_address \$my_ip
openstack-config --set /etc/nova/nova.conf glance api_servers http://controller:9292
openstack-config --set /etc/nova/nova.conf oslo_concurrency lock_path /var/lib/nova/tmp
openstack-config --set /etc/nova/nova.conf placement region_name RegionOne
openstack-config --set /etc/nova/nova.conf placement project_domain_name Default
openstack-config --set /etc/nova/nova.conf placement project_name service
openstack-config --set /etc/nova/nova.conf placement auth_type password
openstack-config --set /etc/nova/nova.conf placement user_domain_name Default
openstack-config --set /etc/nova/nova.conf placement auth_url http://controller:5000/v3
openstack-config --set /etc/nova/nova.conf placement username placement
#此处密码可以设置成变量
openstack-config --set /etc/nova/nova.conf placement password $openstack_user_pw
openstack-config --set /etc/nova/nova.conf scheduler discover_hosts_in_cells_interval 180
# 虚拟机模拟 openstack 可能需要将 virt_type 设置为 qemu,否则创建虚拟机后,一直停在 GRUB Loading stage2
openstack-config --set /etc/nova/nova.conf libvirt virt_type kvm
openstack-config --set /etc/nova/nova.conf libvirt num_pcie_ports 10
yum -y install qemu-kvm-common-ev qemu-kvm-tools qemu-kvm-ev libvirt-daemon-kvm qemu-guest-agent qemu-img-ev
cp /etc/libvirt/libvirtd.conf{,.bak}
cat >/etc/libvirt/libvirtd.conf<<EOF
listen_tls = 0
listen_tcp = 1
tcp_port = "16509"
#此处为计算节点的公网IP地址,可以设置成变量
listen_addr = "$compute_public_ip"
auth_tcp = "none"
EOF
cp /etc/sysconfig/libvirtd{,.bak}
cat >/etc/sysconfig/libvirtd<<'EOF'
LIBVIRTD_ARGS="--listen"
EOF
systemctl enable libvirtd.service openstack-nova-compute.service
systemctl restart libvirtd.service openstack-nova-compute.service
systemctl status libvirtd.service openstack-nova-compute.service

#计算节点之间免密互信登录,解决实例升降配和迁移的问题
usermod -s /bin/bash nova
su - nova
ssh-keygen -N '' -f ~/.ssh/id_rsa
exit计算节点间分别分发公钥,需要交互(注意公钥路径),每个计算节点都要执行此步骤(root用户下执行)。互发公钥就能发给自己了,不然会覆盖别人发来的。
方法1:
#从hosts文件内获取计算节点的IP地址
awk '/compute/ {print $1}' /etc/hosts
#192.168.59.41(compute01)上执行
scp /var/lib/nova/.ssh/id_rsa.pub 192.168.59.42:/var/lib/nova/.ssh/authorized_keys
#192.168.59.42(compute02)上执行
scp /var/lib/nova/.ssh/id_rsa.pub 192.168.59.41:/var/lib/nova/.ssh/authorized_keys#注意权限和所属组(所有 的计算节点执行)
chown -R nova.nova /var/lib/nova/.ssh/authorized_keys
chmod 600 /var/lib/nova/.ssh/authorized_keys方法2(推荐):注:最优方法是所有的计算节点共用一个.ssh目录,从compute01拷贝到其它计算节点即可(root执行)
#获取所有计算节点的IP地址(awk '/compute/ {print $1}' /etc/hosts)
for i in $(awk '/compute/ {print $1}' /etc/hosts);do scp -rp /var/lib/nova/.ssh/ $i:/var/lib/nova/;done
扩展:
#创建一个 Flat 网络
openstack network create --share --external --provider-network-type flat public --provider-physical-network provider
#创建子网
openstack subnet create --network public \
--allocation-pool start=192.168.59.100,end=192.168.59.240 \
--dns-nameserver 223.5.5.5 \
--gateway 192.168.59.2 \
--subnet-range 192.168.59.0/24 subnet_192.168.59
#创建网络接口
openstack port create --network public --fixed-ip subnet=subnet_192.168.59 ip-address=192.168.59.110

#创建指定规格的 flavor
openstack flavor create n1.nano --vcpus 1 --ram 128 --disk 1
#创建虚拟机实例
openstack server create --flavor n1.nano \
--image cirros-0.4.0-x86_64 \
--nic net-id=public \
--security-group default vm01

#验证nova
openstack compute service list
#验证neutron
openstack network agent list
存储节点部署cinder看上面5.2
以下 是ceph分布式存储的部署教程
| 主机名 | 用途 | 磁盘 | 系统 | 公共网络 | 租户网络(VXLAN使用)/集群网络 |
| yum01 | 本地仓库源 | sda/300G | CentOS7.9 | ens33:192.168.59.250/24 | |
| controller | 控制节点 | sda/300G | CentOS7.9 | ens33:192.168.59.40/24 | ens34:10.168.59.40(没用到) |
| compute01 | 计算节点/cinder存储 | sda/300G,sdb/100G | CentOS7.9 | ens33:192.168.59.41/24 | ens34:10.168.59.41 |
| compute02 | 计算节点/cinder存储 | sda/300G,sdb/100G | CentOS7.9 | ens33:192.168.59.42/24 | ens34:10.168.59.42 |
| ceph01 | ceph存储节点/mon01/mgr01 | sda/300G,sdb/100G,sdc/100G/sdd/100G | CentOS7.9 | ens33:192.168.59.11/24 | ens34:10.168.59.11 |
| ceph02 | ceph存储节点/mon02/mgr02 | sda/300G,sdb/100G,sdc/100G/sdd/100G | CentOS7.9 | ens33:192.168.59.12/24 | ens34:10.168.59.12 |
| ceph03 | ceph存储节点/mon03/mgr03 | sda/300G,sdb/100G,sdc/100G/sdd/100G | CentOS7.9 | ens33:192.168.59.413/24 | ens34:10.168.59.13 |
ceph常用命令学习:https://www.likecs.com/show-307682854.html
1、分3部分:存储服务端+客户端+管理节点
存储服务端安装(ceph01、ceph02、ceph03):
yum install -y ceph ceph-mds ceph-radosgw管理节点(ceph01):
yum install -y ceph ceph-mds ceph-radosgw ceph-deploy客户端(controller节点、compute节点):
yum install -y ceph ceph-radosgw2、ceph01是管理节点,那就得要对ceph存储服务节点和客户端做免密登录互信(对所有节点做)
ceph01(管理节点)上执行:
ssh-keygen -N '' -f ~/.ssh/id_rsa
#获取所有节点的hosts解析名
grep 192.168 /etc/hosts|grep -v yum|awk '{print $2}'
#需要交互
for i in $(grep 192.168 /etc/hosts|grep -v yum|awk '{print $2}');do ssh-copy-id $i;done
验证从 ceph01 访问所有主机是否可以免密登录
# ssh ceph01
# ssh ceph02
# ssh ceph03
# ssh controller
# ssh compute01
# ssh compute023、初始化配置 mon(在 ceph01 上执行)
# 新建 Ceph 集群,并生成集群配置文件和密钥文件
mkdir /etc/ceph-cluster && cd /etc/ceph-cluster
ceph-deploy new --cluster-network 10.168.59.0/24 --public-network 192.168.59.0/24 ceph01 ceph02 ceph03
cat >>/etc/ceph-cluster/ceph.conf<<EOF
#禁用不安全的模式
auth_allow_insecure_global_id_reclaim = false
[mon.ceph01]
host=ceph01
mon_addr=192.168.59.11
[mon.ceph02]
host=ceph02
mon_addr=192.168.59.12
[mon.ceph03]
host=ceph03
mon_addr=192.168.59.13
EOF
#初始化 mon 节点(在 ceph01 上执行)
ceph-deploy mon create-initial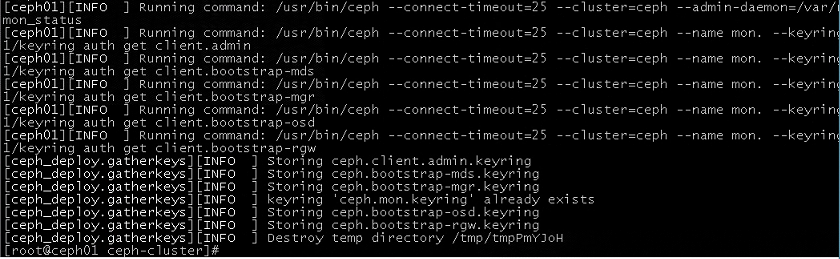
说明:若初始化失败,可kill相关进程,清除相关目录重新安装(从上面“初始化配置 mon”开始)
systemctl stop ceph-crash
rm -rf /etc/ceph/*
rm -rf /var/lib/ceph/*
rm -rf /var/run/ceph/*
rm -rf/var/log/ceph/*
mkdir /var/lib/ceph/mds
mkdir /var/lib/ceph/osd
#如果安装还报错那就重启下系统
4、将 keyring 同步到各节点,以便其它节点可以执行 ceph 集群管理命令(在 ceph01 上执行)
ceph-deploy --overwrite-conf admin ceph01 ceph02 ceph03 controller compute01 compute02
#验证ceph集群
ceph -s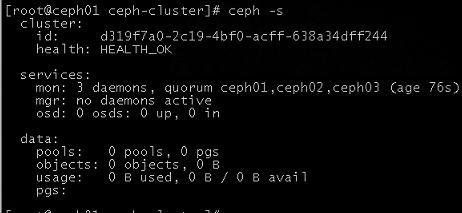
如果有时间偏移,可以重装到对应的节点上同步时间
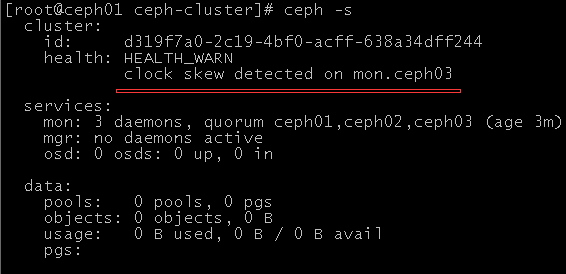
还可以修改配置/etc/ceph-cluster/ceph.conf
mon_clock_drift_allowed = 1.0
5、初始化配置 mgr(在 ceph01 节点上执行)
ceph-deploy mgr create ceph01 ceph02 ceph03
#验证
ceph -s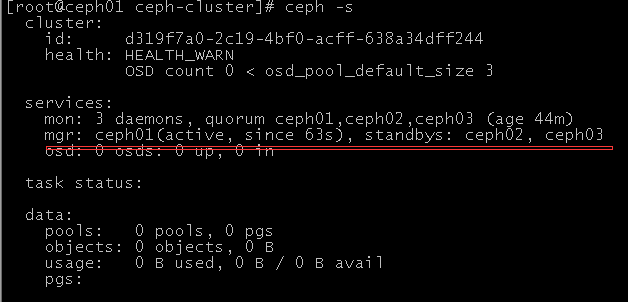
ceph-mgr 进程是主备模式,同一时刻只有一个节点工作,其他节点处于 standby
6、初始化OSD(ceph存储节点上执行)
#列出ceph存储节点上的存储盘(管理节点上ceph01上执行)
ceph-deploy disk list ceph01 ceph02 ceph03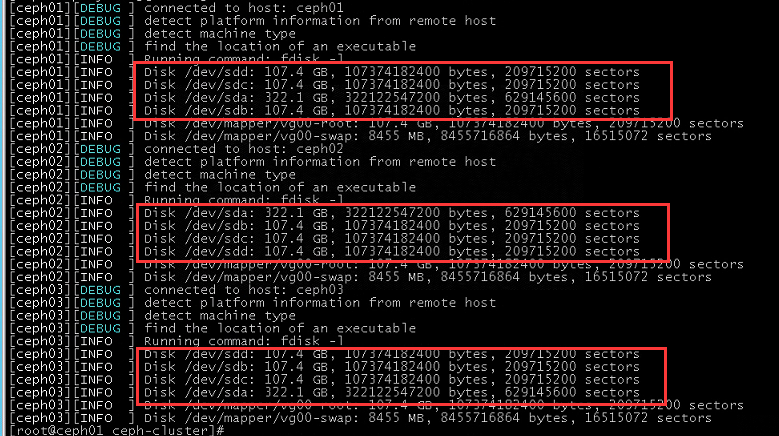
sda为系统盘使用的是lvm分区,vg名为vg00,sdb/sdc/sdd为OSD存储盘
在sda上划分用于OSD的日志分区(WAL)和元数据分区(DB)(ceph存储节点上执行:ceph01、ceph02、ceph03)
生产中建议把日志分区和元数据分区独立出来
例子:每个OSD为4T,每个OSD需要划分一个60G的日志分区和一个180G的元数据分区
lvcreate -L 15G -n lvwal01 vg00
lvcreate -L 15G -n lvwal02 vg00
lvcreate -L 15G -n lvwal03 vg00
lvcreate -L 50G -n lvdb01 vg00
lvcreate -L 50G -n lvdb02 vg00
lvcreate -L 46G -n lvdb03 vg00初始化OSD(管理节点上ceph01上执行)
ceph-deploy osd create ceph01 --data /dev/sdb --block-wal vg00/lvwal01 --block-db vg00/lvdb01 --bluestore
ceph-deploy osd create ceph02 --data /dev/sdb --block-wal vg00/lvwal01 --block-db vg00/lvdb01 --bluestore
ceph-deploy osd create ceph03 --data /dev/sdb --block-wal vg00/lvwal01 --block-db vg00/lvdb01 --bluestore

ceph-deploy osd create ceph01 --data /dev/sdc --block-wal vg00/lvwal02 --block-db vg00/lvdb02 --bluestore
ceph-deploy osd create ceph02 --data /dev/sdc --block-wal vg00/lvwal02 --block-db vg00/lvdb02 --bluestore
ceph-deploy osd create ceph03 --data /dev/sdc --block-wal vg00/lvwal02 --block-db vg00/lvdb02 --bluestore

ceph-deploy osd create ceph01 --data /dev/sdd --block-wal vg00/lvwal03 --block-db vg00/lvdb03 --bluestore
ceph-deploy osd create ceph02 --data /dev/sdd --block-wal vg00/lvwal03 --block-db vg00/lvdb03 --bluestore
ceph-deploy osd create ceph03 --data /dev/sdd --block-wal vg00/lvwal03 --block-db vg00/lvdb03 --bluestore
如果初始化OSD出错 了:可以使用下列方解决:跳转
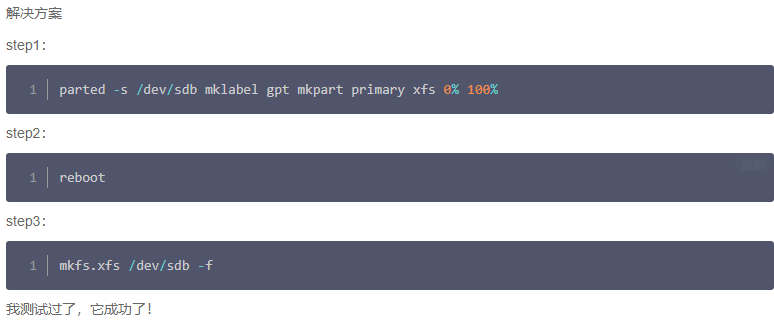
#验证OSD
ceph -s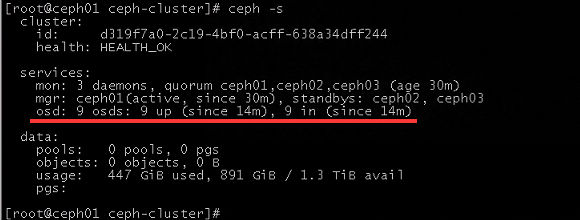
ceph osd tree
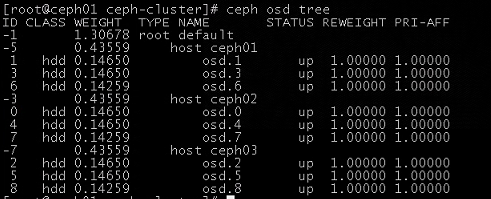
7、openstack集成 ceph存储
流程:
7.1、管理节点(ceph01)免密到controller节点和compute节点(已完成 )
7.2、控制节点和计算节点安装ceph软件包作为ceph客户端(已完成 )
7.3、在ceph01上创建所需的存储池,根据实际的OSD数量修改PG数目
ceph osd pool create volumes 128
ceph osd pool create images 32
ceph osd pool create backups 32
ceph osd pool create vms 128
查看创建的存储池
ceph osd pool ls
PG数量的计算:
PG和PGP数量一定要根据OSD的数量进行调整,计算公式如下,但是最后算出的结果一定要接近或者等于一个2的指数,结算的结果往上取靠近2的N次方的值。
Total PGs = (Total_number_of_OSD * 100) / max_replication_count
此处 是9个OSD,默认副本数是3,pool的数量 是4个。那么按上述公式计算出的结果是300。上取跟它接近的2的N次方(9)是512,那么每个pool分配的PG数量就是128。
#将 ceph01 上的配置文件同步到客户端( controller 和 computer01、computer02 节点)(已完成 )
#ceph-deploy --overwrite-conf admin controller compute01 compute02
7.4、创建 openstack 各组件需要的 ceph 用户并授权(ceph01上执行)
#在 ceph01 上为 cinder、glance、cinder-backup 用户创建密钥,允许其访问 Ceph 存储池。
#创建用户 client.cinder,对 volumes 存储池有 rwx 权限,对 vms 存储池有 rwx 权限,对 images 池有 rx 权限
ceph auth get-or-create client.cinder mon 'allow r' osd 'allow class-read object_prefix rbd_children, allow rwx pool=volumes, allow rwx pool=vms,allow rx pool=images'
#创建用户 client.glance,对 images 存储池有 rwx 权限
ceph auth get-or-create client.glance mon 'allow r' osd 'allow class-read object_prefix rbd_children, allow rwx pool=images'
#创建用户 client.cinder-backup,对 backups 存储池有 rwx 权限
ceph auth get-or-create client.cinder-backup mon 'profile rbd' osd 'profile rbd pool=backups'

#将 glance 的 keyring 保存到 controller(glance 服务所在节点)上
ceph auth get-or-create client.glance | ssh controller tee /etc/ceph/ceph.client.glance.keyring
ssh controller chown glance:glance /etc/ceph/ceph.client.glance.keyring
#将 cinder 的 keyring 保存到(控制节点、计算节点、存储节点 服务所在节点)上。使用下面的批量命令
#ceph auth get-or-create client.cinder | ssh controller tee /etc/ceph/ceph.client.cinder.keyring # 还有 computer0{1..n}上
#ssh controller chown cinder:cinder /etc/ceph/ceph.client.cinder.keyring # 还有 computer0{1..n}上
for h in controller compute01 compute02
do
ceph auth get-or-create client.cinder | ssh $h tee /etc/ceph/ceph.client.cinder.keyring
ssh $h chown cinder:cinder /etc/ceph/ceph.client.cinder.keyring
done

#将 cinder-backup 的 keyring 保存到 (cinder-backup 服务所在节点,此处是 controller/computer01/computer02)上
for h in controller compute01 compute02
do
ceph auth get-or-create client.cinder-backup | ssh $h tee /etc/ceph/ceph.client.cinder-backup.keyring
ssh $h chown cinder:cinder /etc/ceph/ceph.client.cinder-backup.keyring
ceph auth get-key client.cinder | ssh $h tee client.cinder.key
done
7.5、在计算节点(compute01、compute02)上向 libvirt 添加秘钥(计算节点执行)
#生成一个新UUID:(universally unique identifier):全局唯一标识符
#uuidgen会生成一个新的UUID:d61f18d0-e7a6-45b6-ae8f-b40acb88d3b5

UUID=d61f18d0-e7a6-45b6-ae8f-b40acb88d3b5
cd /etc/ceph
cat >secret.xml<<EOF
<secret ephemeral='no' private='no'>
<uuid>${UUID}</uuid>
<usage type='ceph'>
<name>client.cinder secret</name>
</usage>
</secret>
EOF

#添加密钥到 libvirt
virsh secret-define --file secret.xml
virsh secret-set-value --secret ${UUID} --base64 $(cat /etc/ceph/ceph.client.cinder.keyring|grep key | awk -F ' ' '{ print $3 }')
#查看添加后的密钥
virsh secret-list
virsh secret-get-value d61f18d0-e7a6-45b6-ae8f-b40acb88d3b5
8、配置 Glance 集成 Ceph 作为后端存储并验证(controller节点执行)
#openstack-config --set /etc/glance/glance-api.conf DEFAULT show_image_direct_url True
sed -i '/stores = file,http/c #stores = file,http' /etc/glance/glance-api.conf
sed -i '/default_store = file/c #default_store = file' /etc/glance/glance-api.conf
openstack-config --set /etc/glance/glance-api.conf glance_store filesystem_store_datadir /var/lib/glance/images/
openstack-config --set /etc/glance/glance-api.conf glance_store stores rbd,file,http
openstack-config --set /etc/glance/glance-api.conf glance_store default_store rbd
openstack-config --set /etc/glance/glance-api.conf glance_store rbd_store_pool images
openstack-config --set /etc/glance/glance-api.conf glance_store rbd_store_user glance
# 镜像存储在 ceph 中会被分割成多个对象,单个对象大小,单位是 MB,该值最好是 2 的幂次方,默认是 8,chunk_size 不能太大,当镜像小于 chunk_size时会上传失败
openstack-config --set /etc/glance/glance-api.conf glance_store rbd_store_chunk_size 8
openstack-config --set /etc/glance/glance-api.conf glance_store rbd_store_ceph_conf /etc/ceph/ceph.conf
#openstack-config --set /etc/glance/glance-api.conf paste_deploy flavor keystone
#在控制节点(controller)重启 glance-api 服务。
systemctl restart openstack-glance-api.service

#在web界面删除所有的镜像

#验证镜像上传
cd ~
source admin-openrc.sh
openstack image create "cirros-0.4.0-x86_64" --file cirros-0.4.0-x86_64-disk.img --disk-format qcow2 --container-format bare --public
#可看进度上传镜像
#glance image-create --name cirros-0.4.0-x86_64 --disk-format qcow2 --container-format bare --progress < cirros-0.4.0-x86_64-disk.img
rbd ls images
openstack image list
#rbd info images/镜像的ID
rbd info images/c209da35-e496-427a-8dda-4da67c853fba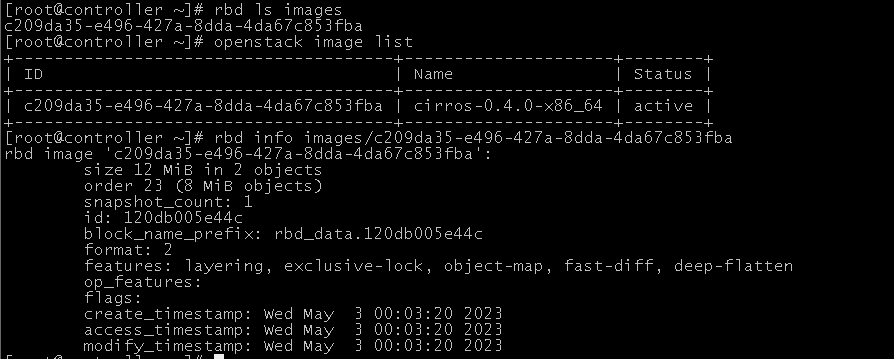
9、配置 Cinder 集成 Ceph 作为后端存储并验证(controller节点+cinder存储节点(compute01+compute02)执行)
controller节点执行:
sed -ri 's/^(default_volume_type.*)/#\1/g' /etc/cinder/cinder.conf
openstack-config --set /etc/cinder/cinder.conf DEFAULT default_volume_type ceph
systemctl restart openstack-cinder-api.service openstack-cinder-scheduler.service
cinder存储节点(compute01+compute02)执行:
sed -ri 's/^(enabled_backends.*)/#\1/g' /etc/cinder/cinder.conf
openstack-config --set /etc/cinder/cinder.conf DEFAULT enabled_backends ceph,lvm
cat >>/etc/cinder/cinder.conf<<EOF
[ceph]
volume_driver = cinder.volume.drivers.rbd.RBDDriver
volume_backend_name = ceph
rbd_pool = volumes
rbd_ceph_conf = /etc/ceph/ceph.conf
rbd_flatten_volume_from_snapshot = false
rbd_max_clone_depth = 5
rbd_store_chunk_size = 4
rados_connect_timeout = -1
glance_api_version = 2
rbd_user = cinder
# 注意 uuid 后面不要复制空格
rbd_secret_uuid = d61f18d0-e7a6-45b6-ae8f-b40acb88d3b5
EOF
systemctl restart openstack-cinder-volume.service
在web端创建实例验证:
1、先创建一个 ceph 的卷类型
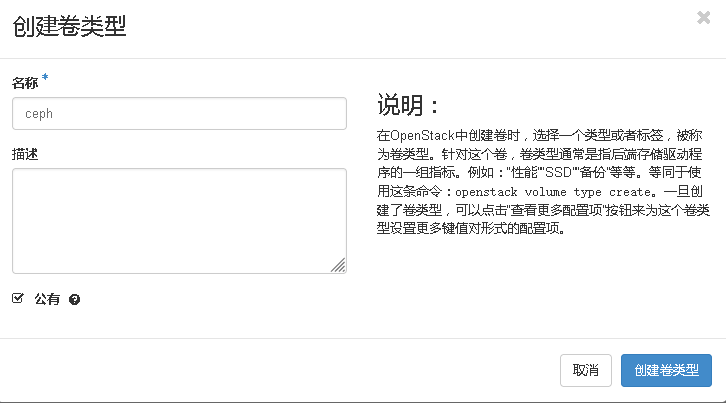
创建之后删除不掉,说是默认卷类型无法删除
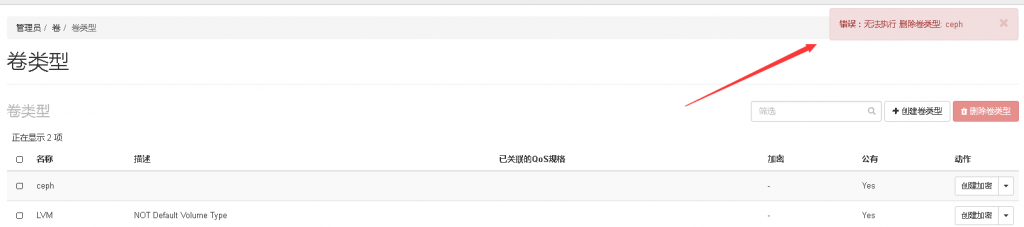

2、为 ceph 卷类型增加一个元数据 volume_backend_name=ceph
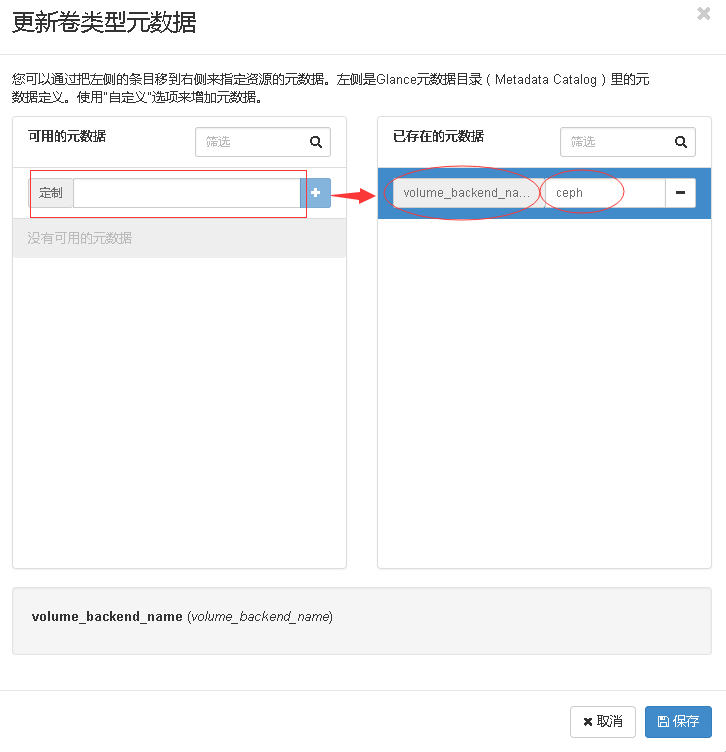
3、创建实例,看是否使用了 ceph 创建卷

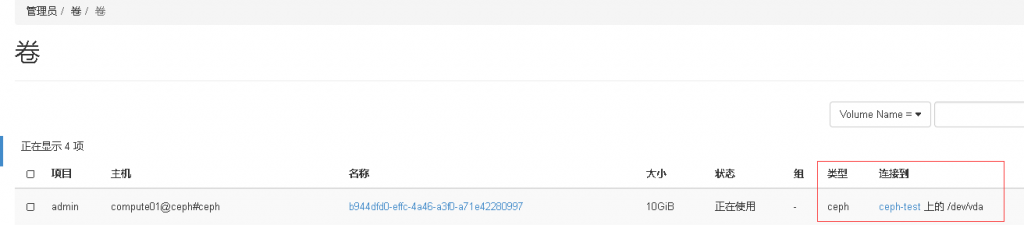
上图可以看出块设备的ID:b944dfd0-effc-4a46-a3f0-a71e42280997,在ceph管理节点上(ceph01)查看块设备是对应的。

此时的openstack平台是即能创建ceph卷也能创建lvm卷
10、配置 cinder_backup 集成 Ceph 作为后端存储并验证
cinder-backup 用于将卷(volume)备份到其他存储系统上,目前支持的备份存储系统有 swift、ceph 以及 IBM Tivoli Storage Manager(TSM),默认为
Swift,但需要配置 swift 组件。
在存储节点(compute01、compute02)上修改配置文件/etc/cinder/cinder.conf
openstack-config --set /etc/cinder/cinder.conf DEFAULT backup_driver cinder.backup.drivers.ceph.CephBackupDriver
openstack-config --set /etc/cinder/cinder.conf DEFAULT backup_ceph_conf /etc/ceph/ceph.conf
#在7.4步创建的cinder-backup用户
openstack-config --set /etc/cinder/cinder.conf DEFAULT backup_ceph_user cinder-backup
openstack-config --set /etc/cinder/cinder.conf DEFAULT backup_ceph_chunk_size 4194304
openstack-config --set /etc/cinder/cinder.conf DEFAULT backup_ceph_pool backups
openstack-config --set /etc/cinder/cinder.conf DEFAULT backup_ceph_stripe_unit 0
openstack-config --set /etc/cinder/cinder.conf DEFAULT backup_ceph_stripe_count 0
openstack-config --set /etc/cinder/cinder.conf DEFAULT restore_discard_excess_bytes true
#启动 cinder backup 服务进程并设置成开机自启动
systemctl enable openstack-cinder-backup.service
systemctl restart openstack-cinder-backup.service
另外,在 dashboard 配置(/etc/openstack-dashboard/local_settings)中的OPENSTACK_CINDER_FEATURES 中增加如下配置。(controller节点执行已完成)
OPENSTACK_CINDER_FEATURES = {
‘enable_backup’: True,
}
#重启 httpd 服务进程。
systemctl restart httpd
验证:
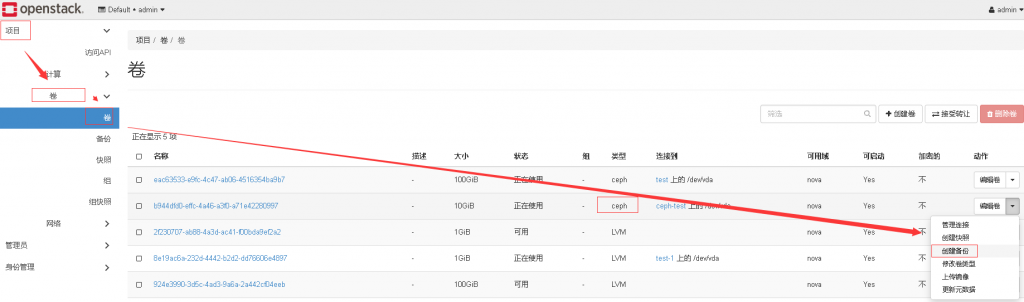
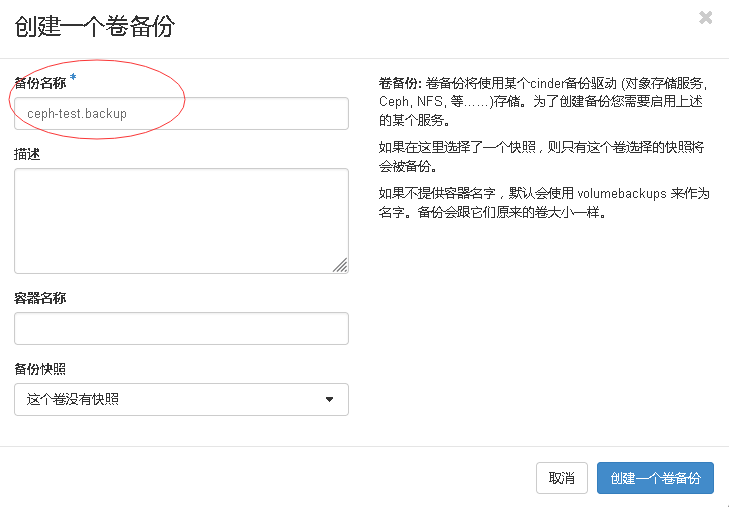
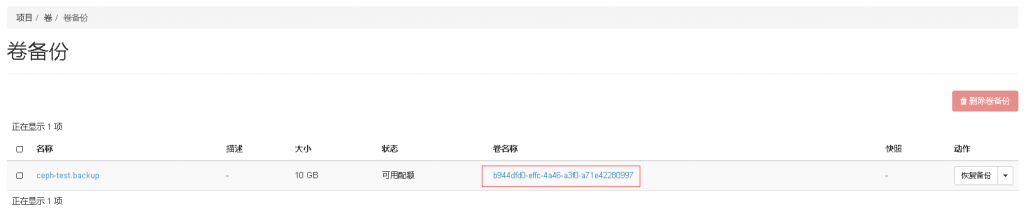
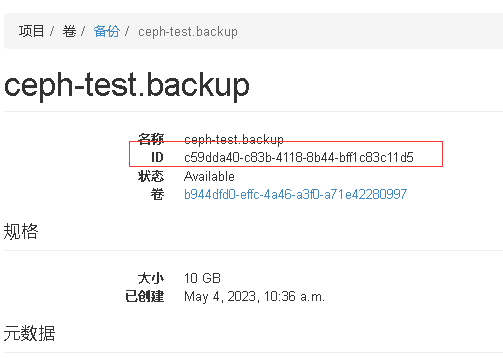

11、配置 Nova 集成 Ceph(实现实例的热迁移)(计算节点上执行)
在 Nova 计算节点(compute01、compute02)上,修改配置文件/etc/nova/nova.conf
openstack-config --set /etc/nova/nova.conf DEFAULT live_migration_flag "VIR_MIGRATE_UNDEFINE_SOURCE,VIR_MIGRATE_PEER2PEER,VIR_MIGRATE_LIVE,VIR_MIGRATE_PERSIST_DEST,VIR_MIGRATE_TUNNELLED"
openstack-config --set /etc/nova/nova.conf libvirt inject_partition -2
openstack-config --set /etc/nova/nova.conf libvirt images_type rbd
openstack-config --set /etc/nova/nova.conf libvirt images_rbd_pool vms
openstack-config --set /etc/nova/nova.conf libvirt images_rbd_ceph_conf /etc/ceph/ceph.conf
#要加引号的
openstack-config --set /etc/nova/nova.conf libvirt disk_cachemodes \"network=writeback\"
openstack-config --set /etc/nova/nova.conf libvirt rbd_user cinder
openstack-config --set /etc/nova/nova.conf libvirt rbd_secret_uuid d61f18d0-e7a6-45b6-ae8f-b40acb88d3b5
systemctl restart openstack-nova-compute.service
验证:
基于ceph存储的进行迁移操作
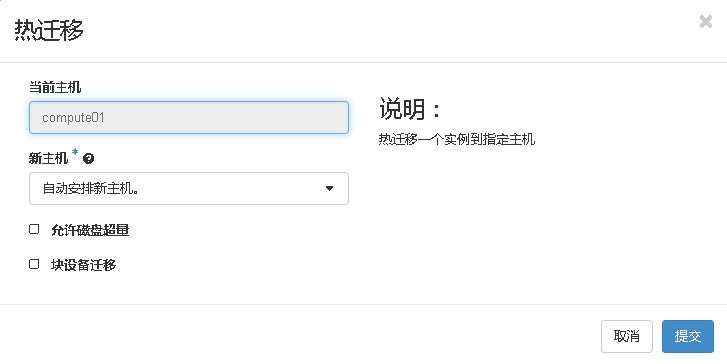
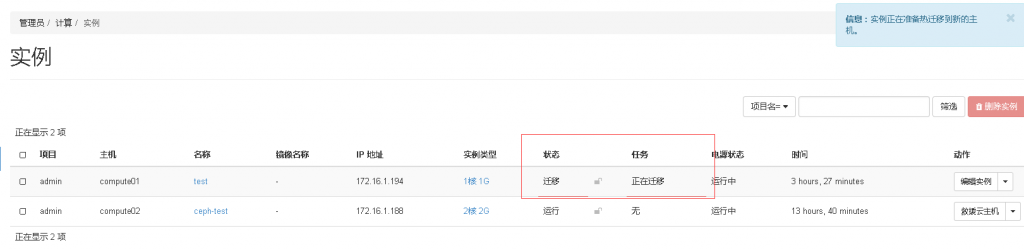
迁移成功
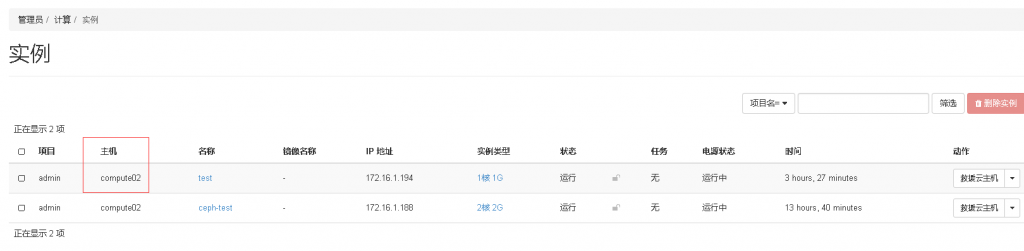
12、开启dashboard功能
参考:https://blog.51cto.com/lingxudong/5933115
https://www.cnblogs.com/klvchen/articles/15767719.html
#在每个mgr节点安装
yum install -y ceph-mgr-dashboard
#上一步完成之后才能开启mgr功能(ceph01上操作即可)
ceph mgr module enable dashboard
#生成并安装自签名的证书
ceph dashboard create-self-signed-cert
#创建一个dashboard登录用户名密码
cd ~
echo "www.123.nyc" > 1.txt
#                            用户名    密码   角色
ceph dashboard ac-user-create admin -i 1.txt administrator
rm -rf 1.txt
#查看服务访问方式
ceph mgr services
#{
#   "dashboard": "https://ceph01:8443/"
#}
#查看组件
ceph mgr module ls

########################################################################################
#配置ssl (可选)
# ceph dashboard create-self-signed-cert
# openssl req -new -nodes -x509 -subj "/O=IT/CN=ceph-mgr-dashboard" -days 3650 -keyout dashboard.key -out dashboard.crt -extensions v3_ca
# ceph config-key set mgr mgr/dashboard/crt -i dashboard.crt
# ceph config-key set mgr mgr/dashboard/key -i dashboard.key

########################################################################################
#修改默认配置命令
#指定集群dashboard的访问端口
# ceph config-key set mgr/dashboard/server_port 7000
指定集群 dashboard的访问IP
# ceph config-key set mgr/dashboard/server_addr $IP

########################################################################################
#开启Object Gateway管理功能
#1、创建rgw用户
# radosgw-admin user info --uid=user01
#2、提供Dashboard证书
# ceph dashboard set-rgw-api-access-key $access_key
# ceph dashboard set-rgw-api-secret-key $secret_key
#3、配置rgw主机名和端口
# ceph dashboard set-rgw-api-host 10.151.30.125
#4、刷新web页面
web访问测试
#ceph01的IP地址
https://192.168.59.11:8443
用户名和密码admin/www.123.nyc
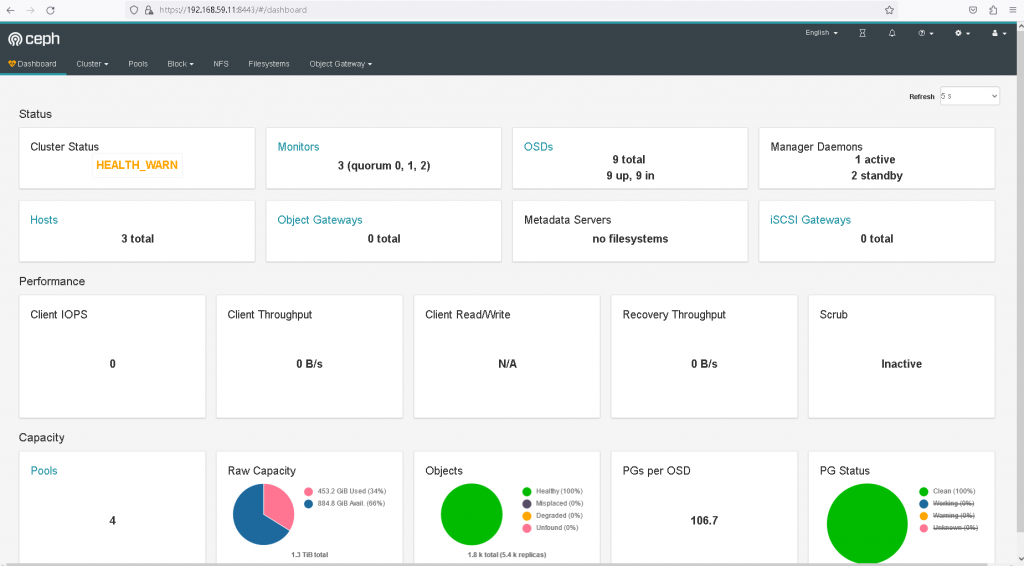
ceph健康检测有问题
参考:https://www.cnblogs.com/sunbines/p/15528201.html
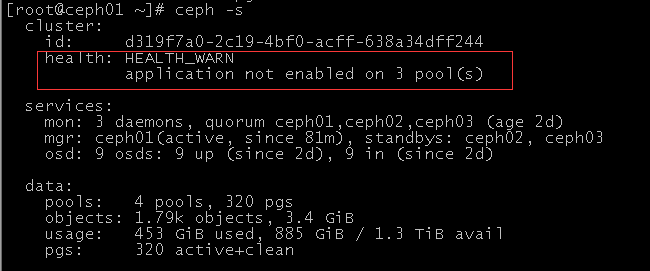
解决方法:
ceph health detail
ceph osd pool application enable volumes rbd
再次查看健康状态就是正常了

至此ceph已经集成到了openstack平台上了